

When you create your WordPress website, it is important that people can easily reach your website. DNS configuration is a system that converts the name of a website into its IP address just like a phonebook finds a number from a name.
Many people, especially those who are new to running a website, say that setting up DNS is difficult. But from our experience it is very important. If the Domain Name Server is not set up properly, your website may have downtime (the website stops working), and you may suffer traffic loss (people do not come to the website), which can prove to be bad for your site.
In this Ultimate Guide, we will tell you how to set up DNS in a simple and straightforward way. Every step is designed for beginners, so that you can easily manage your Domain Name System settings and keep the website always available for people
Want to stay ahead with AI-driven in WordPress insights and stay updated with the latest trends? Subscribe for daily search insights at wpguidepro.com to improve your WordPress strategy.
Table of Contents
What is WordPress DNS?
DNS i.e. Domain Name System is a system that helps you to reach websites. It converts human-readable names (like wpguidepro.com) to IP addresses.
When you type the name of a website in your browser (like wpguidepro.com), then DNS converts it to the special number i.e. IP address of that server (like 192.124.249.166). Then it takes your device to the correct place where the website is stored.
The combination of name of website and IP address is also known as DNS record.
When you are running a WordPress website, it is important understand how these DNS records work and how they are set up correctly.
How Does DNS Work?
You can think of DNS as the phone directory of the internet, where you get the path to every website.
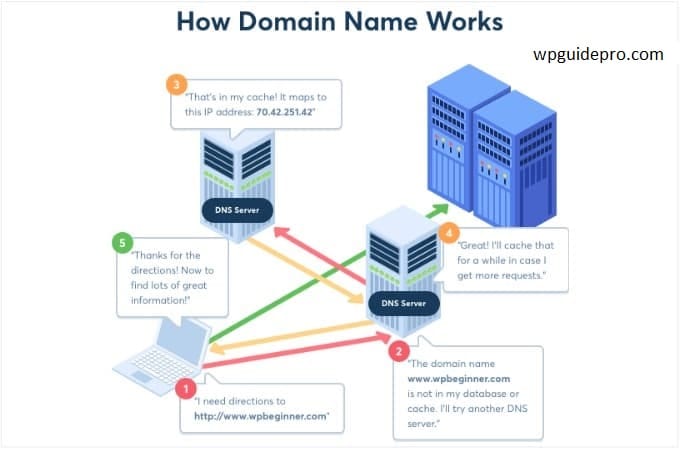
You can easily understand how Domain Name works if you follow these steps:
Imagine you type www.wpguidepro.com in your browser and press Enter. At that time your computer checks whether you have opened this site before or not.
- If you have visited it before and the record is saved in the computer, then the website opens directly. If the DNS record is not found, then the request is sent to your DNS server. This server is usually that of your internet provider (ISP) or domain hosting company.
- If there is no record there, then the request goes to the root nameservers. These are separate servers in the world that store Domain Name data.
- When the DNS record is found, it is saved (cached) in your computer, and then the website server is located and the connection is established.
Now you can easily see www.wpguidepro.com on your screen
Configuring WordPress DNS Settings
Now that you understand what Domain Name System is and how it works, let’s see how to set up DNS for a WordPress website.
Usually the DNS settings are controlled by the company from where you purchased your domain name (like GoDaddy or Namecheap) or the WordPress hosting company (like Bluehost). You can manage and edit NS records by opening these settings.
Remember that the settings of every hosting are slightly different. In this guide, we are taking the example of Bluehost.
Step-by-step process:
- First of all, you have to login to your Bluehost account.
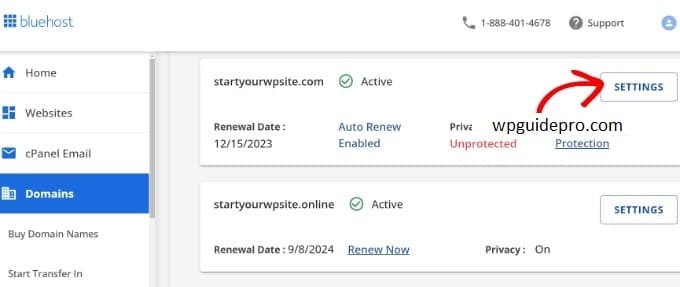
- Click on Domains from the left side menu.
- Now find your website and click on the Settings button in front of it.
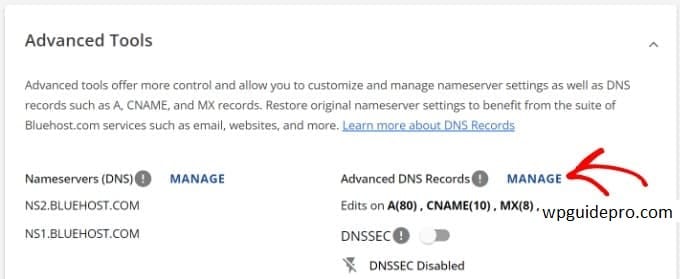
- Now you will see the domain settings. Scroll down and click on Advanced Tools.

Here you will find the option of Advanced DNS Records. Click on the Manage button in front of it.
A warning message will appear which says that only advanced users can change the Domain Name System records. Simply click on Continue.

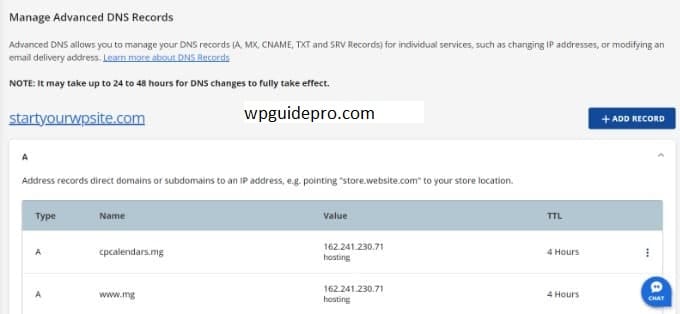
Now different DNS records will appear in front of you, which you can change and set Domain Name for your website.
Some important DNS record types:
- A Record (Address Record): This connects the name of your website to an IP address.
- CNAME Record: This links a domain or subdomain to another domain name.
- MX Record (Mail Exchanger): This sends your domain emails to the email server that handles them.
- TXT Record: This provides some extra information in text format, such as to verify Google Search Console
How to Change Domain Nameservers
Domain Nameservers are a special type of server that saves all DNS records for your domain name. Their job is to give Domain Name System information to anyone who asks for it.
You can access your website’s nameservers through your WordPress hosting service or a domain name registrar (such as GoDaddy or Namecheap). Each nameserver has its own address and can store records for multiple websites.
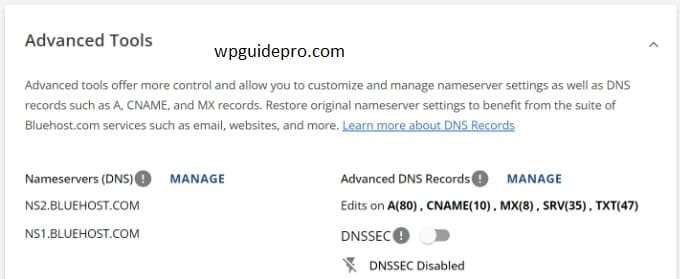
you’re using Bluehost, nameservers will look something like this:
NS1.bluehost.com

NS2.bluehost.com
The nameserver address may be different depending on your hosting provider or domain service.
Normally, there are two reasons to change nameservers:
You are shifting your website to a new hosting.
You are installing a firewall (like Sucuri or Cloudflare) to protect your site.
If you are moving your WordPress website to a new hosting, then changing the nameserver is necessary. This way your domain will point to the new hosting.
And if you are using WAF (Web Application Firewall) to secure your site, then also you have to change the nameservers. WAF protects your site from hackers by blocking them at the DNS level.
Properly Setting Up Redirections in WordPress
Redirection is an important part of WordPress settings. But redirection doesn’t happen at the DNS level. However, some domain companies (like GoDaddy or Namecheap) give you the option to set redirection in your DNS settings.
Example: If you are moving your website to a new domain, or want to redirect an old link to a new link, then updating DNS records is also necessary.
If you are setting the redirection manually, then there are more chances of making mistakes This can redirect your WordPress site back to the old website.
A common cause of this problem is a DNS issue. If the record is not updated, or the server is not working, then people will not be able to see your new website.
To avoid this problem, you can use WordPress SEO plugins such as AIOSEO This plugin has a strong redirection manager that helps you set up redirections.
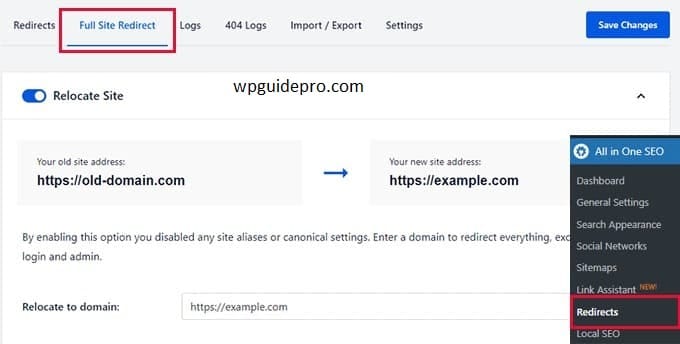
Benefits of AIOSEO:
- You can easily migrate domains.
- Setting up redirects is easy.
- There is no tension of Domain name system.
- Shows 404 error log and helps fix broken links
How to Change MX Records for WordPress Site
MX or Mail Exchange records tell where to send emails from or to your website.
If you want to create business emails from your domain name, you need to change the MX record.
Example: If you want to create emails using Google Workspace, such as name@mywebsite.com, you need to set the MX record to Gmail servers.
The second place you might need to change the MX record is when you send WordPress emails via SMTP service — so that the emails don’t go to spam
To change or add an MX record, you need to login to your WordPress hosting or domain registrar (like Hostinger) account.
Example: If you are using Hostinger, go to the Domains section, then open the DNS / Nameservers option. After that you can add a new record by going to Manage Domain Name System records and choose the record type MX.
How to Clear DNS Cache from Your Computer
Have you ever been told to flush your computer’s Domain Name System cache?
The DNS cache is like a small book that contains the IP addresses of the websites your computer has visited Sometimes it becomes outdated, which can cause DNS problems in your WordPress website.
Flushing the Domain Name System cache solves this problem. This means that your computer takes new and fresh details and updates the cache.
This happens differently in every computer. For example, in Windows, you have to open the Command Prompt and type this command:
ipconfig /flushdns
