
")
If you are running a blog where many people write, then sometimes there are guest authors who do not have a WordPress account. Or sometimes you may want a different name to be displayed on a post instead of the default admin name.
You can easily manage all of this in WordPress. If you want, you can use a plugin for this, or you can show a different author name for each post by doing a little work yourself.
In this guide, we will explain step by step how you can change the name of a guest on a WordPress website. You can use a plugin or you can also write the name manually through a custom field.
Want to stay ahead with AI-driven in WordPress insights and stay updated with the latest trends? Subscribe for daily search insights at wpguidepro.com to improve your WordPress strategy.
Table of Contents
Why Rewrite Guest Author Names
Before starting with the methods, it is important to understand why changing name or using a custom name is helpful.
• Guest Authors People who write only one or two posts, their name needs to be shown but it is not necessary to create a separate WordPress account for them.
• Branding Sometimes you want the author’s name to sound like your brand or use a special name (pseudonym).
• Clarity When a post is written by the team or by someone else (ghostwriting), it should be clearly visible who wrote it.
• SEO Benefit When the author’s name is written correctly, it helps search engines like Google to understand the content of your site
Add Guest Author Name With a WordPress Plugin
If you are looking for an easy and beginner-friendly way, then WordPress plugins are best for you. These plugins make your work easy and you do not need to do coding.
Step-by-Step Guide
Choose and Install a Plugin First choose a plugin that supports guest mode feature. Popular plugins are:
- Co-Authors Plus
- Simple Author Box
- PublishPress
To install the plugin
- Login to your WordPress dashboard.
- Go to the left side menu Plugins > Add New.
- Search for your plugin, click on Install Now, then activate.
Set Plugin Settings
After the plugin is activated, open its settings. The settings of every plugin are slightly different, but generally you have to do these things:
- Create a new profile for the guest mode.
- Set a custom name or fake name (pseudonym) for the post.
- Set how to display the guest mode name below the post.
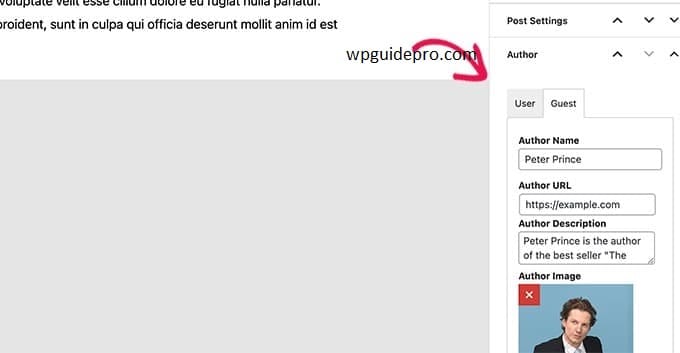
Example: If you are using Co-Authors Plus, then you can add one or more authors while writing the post.
Check your changes
After setting everything:
- Go to any post and see if name is showing correctly or not.
- Preview the post on both mobile and desktop, so that the design looks good.
Pros (Benefits)
• Easy and fast way
• You can use it even if you don’t know coding
• Everything can be managed from the WordPress dashboard itself
Cons (Disadvantages)
• Not compatible with every theme
• Too many plugins can make the website slow
Add Guest Author in WordPress With Custom Fields
In this method we use custom fields. This method is lightweight and you do not need to install an extra plugin.
Step-by-Step Guide
Enable Custom Fields in WordPress
Custom Fields is a built-in feature, but is hidden by default.
How to enable it:
- Open your WordPress post.
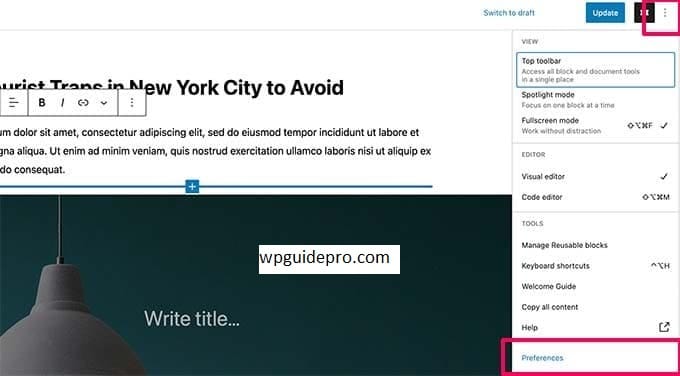
- Click on Screen Options in the upper right corner.
- Tick the checkbox of Custom Fields there.
- Now the “Custom Fields” section will appear below your post editor.
Add the name of the guest author
Scroll down where Custom Fields is visible.
- Click on Add New.
- In the Name box write: guest_author
- In the Value box write: guest’s full name (e.g.: Ahmed Khan)
- Save.
Add code in your theme file
Now we will show the author’s name on the front end of the post.
But keep in mind: do this work in child theme, otherwise all changes can be deleted due to theme update in future.
How to do it:
- Open your hosting’s File Manager or FTP client.
- Go to your theme’s folder (wp-content > themes > your-theme).
- Find the file where the author’s name is shown (e.g. single.php or content-single.php).
Paste the below PHP code there:
<?php
$guestauth = get_post_meta($post->ID, 'guest_auth', true);
if (!empty($guestauth)) {
    echo esc_html($guestauth);
} else {
    the_auth();
}
?>
What will this code do:
If the guest author name is given in the custom field, then that name will be displayed. If it is not given, then the normal WordPress name will be displayed.
Test your changes Refresh the website and see if the guest author name is displayed correctly or not.
Open different posts where a custom name is given or not check both.
Pros
• Plugin does not need to be installed – website remains fast
• You have full control over design and function
• Works easily with more themes
Cons
• Some basic coding is required
• If there is a problem in the code by mistake, the website can break (make sure to take backup)
Final Thoughts on Rewriting Guest Author Names
Changing the name of a guest WordPress seems like a small thing, but it makes your blog look more professional and nice.
If you want to do it quickly and easily, then using a plugin is the best way
But if you like to be clean and customize your own way, using custom fields is also a good option.
Whether you use a plugin or custom fields, make sure that the changes you make match the design and style of your website.
With this setup, you can display the name of a smart and professional author on your blog and every writer gets respect too.
