

Imagine you’re looking at your website data and suddenly, traffic spikes. The question is: why did this spike occur? Did a new blog post go viral, a holiday sale, or a social media shoutout? Without context, these just seem like confusing numbers.
This is where GA4 annotations come in. They’re basically little notes you add to your traffic graph so you always remember why the numbers changed. This feature used to be easily available in Universal Analytics, but with GA4, Google removed this option. This is why many marketers and site owners are now searching for a replacement.
The good news is that you can use annotations and site notes right inside the WordPress dashboard. In this guide, you’ll learn step-by-step what annotations are, why they’re so important, and how to easily set them up for GA4.
Want to stay ahead with AI-driven WordPress insights and stay updated with the latest trends? Subscribe for daily search insights at wpguidepro to improve your WordPress strategy.
Table of Contents
What Are Google Analytics GA4 Annotations?
Google Analytics annotations are small, dated notes you can add to your reports. They’re like digital sticky notes pasted onto your data charts.
For example, you might use annotations when you:
- Launched a marketing campaign
- Published an important blog post
- Redesigned your homepage
- Encountered site downtime
- Were featured in a news article.
In the old Universal Analytics, these notes appeared as small icons on traffic graphs. Hovering over them revealed details. This allowed you to easily connect to the impact of your marketing efforts or site changes on performance.
Why Get GA4 Annotations in WordPress?
GA4 is a strong analytics tool, but it doesn’t yet have the easy annotation feature that the old Universal Analytics had. This makes remembering website changes and events a bit difficult. If you don’t use annotations, you either have to rely on memory or use separate spreadsheets and tools.
Incorporating GA4 annotations within WordPress solves this problem and provides a few benefits:
All in one place: Website data and its context are in one place. You don’t need to check different documents or accounts.
Easy for teams: All team members can see notes such as site updates, campaigns, or technical issues. Both developers and content marketers can easily understand the impact.
Correct data analysis: A traffic drop or spike may seem confusing at first, but annotations help pinpoint the reason maintenance or a new campaign.
History record: These notes, along with monthly and yearly data, create a useful historical log, which is handy for reports and new team members.
Adding this feature to WordPress simplifies and smartens your analytics workflow, allowing you to make better decisions.
How to Get GA4 Annotations Site Notes in WordPress
The annotations feature is missing in GA4. But don’t worry. The WordPress plugin MonsterInsights solves this problem. Its Site Notes feature does exactly what GA4 lacks.
This allows you to add notes directly from the WordPress dashboard. They automatically appear in GA4 reports.

Step 1: MonsterInsights Install and Setup
First, download the plugin. Using Site Notes requires the Plus plan or higher.
- In the WordPress dashboard, go to: Plugins » Add New » Upload Plugin.
- Select the downloaded .zip file and click Install Now.
- After installation, click Activate Plugin.
Once activated, the setup wizard will open. It’s simple; just follow the instructions and connect your site to GA4.
Step 2: Enable the Site Notes Addon
Annotations work through the Site Notes addon.
- Go to the dashboard: Insights » Addons.
- Find the Site Notes addon and press Install.
- It will automatically activate.
Now you’re ready to add notes to GA4 reports. Everything will happen within WordPress, no separate spreadsheets or tools required.
Adding Site Notes and Annotations in WordPress
Adding, viewing, and managing site notes in MonsterInsights is very easy.
How to create a new Site Note?
There are two ways to add a note:
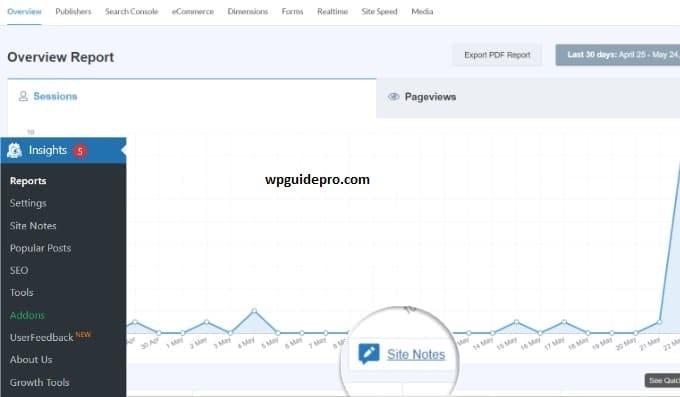
From the Reports graph, go to Insights » Reports.
There will be a small + Add a Site Note button in the traffic graph. Click it, and a box will open where you can enter details.
From the Site Notes page, go to Insights » Site Notes. There will be an Add New Site Note button at the top. Click it.
The following are the items to fill in the box:
Note: Write a short description of what happened (e.g., “Spring Sale Email Launch”).
Date: Today’s date will automatically appear, but you can also select a past or future date.
Category: Give the note a category, such as Blog Post, Campaign, or Site Update. You can also create your own custom category.
Media: If desired, you can add an image or file for extra detail.
Once everything is set, click the Add Site Note button.
How to view notes?
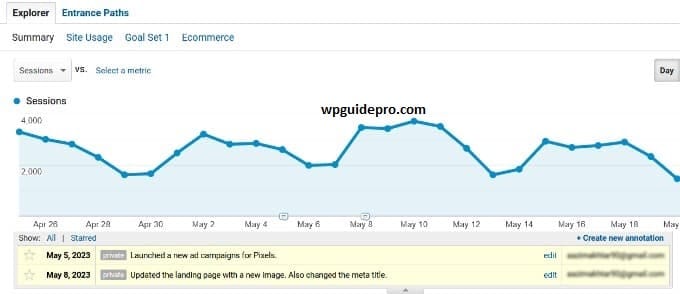
Your notes will appear as small icons on the traffic graph. Each category has its own color. Hover over the icon and details will appear.
To see all your notes in one place, go to Insights » Site Notes. There you can edit, delete, and filter by date and category.
This way you can easily understand why website traffic is up or down.
