

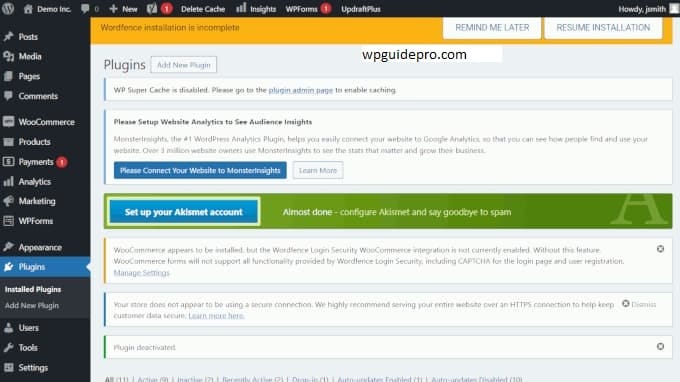
Following WordPress admin notification center is like having small sticky notes on your desk and scattered all over the place.
Some alerts appear at the top of the dashboard, some are hidden inside plugin settings, and some just disappear without you even noticing.
We also face this problem when we work on client websites. We want our clients not to miss important messages, like an update message or a new order notification.
In this guide, we will show you how to add a notification center in WordPress. This will help you easily see all the important updates without any tension or confusion.
Want to stay ahead with AI-driven WordPress insights and stay updated with the latest trends? Subscribe for daily search insights at wpguidepro to improve your WordPress strategy!
Table of Contents
Why Add Notification Center in WordPress?
Easy way to do work
Notification center is a place where all messages, alerts and updates are collected. Now there is no need to go to different pages to check. Everything is available in one place. This saves time and important things are not missed.
When more people work on the website
If more people are working on the website – like admin, editor, or writer – then notification center is helpful for everyone. Everyone can see what work is not being done and what has happened. You can also tell your team about important things, like when work will stop or if you need to check a post.
See important things
first Not every message is important. Notification center helps you to see important things first. Like if there is a security message then it should come on top, and simple updates should be below. This way work is done in the right order.
Less messages clean dashboard
If there are too many plugins on your website then every plugin shows its message. This makes the dashboard look very full. Notification center compiles all the messages or gives the option to filter them. This makes the admin area clear and easy to understand.
How to Add a Notification Center in WordPress
Method 1: Using a Plugin Solution
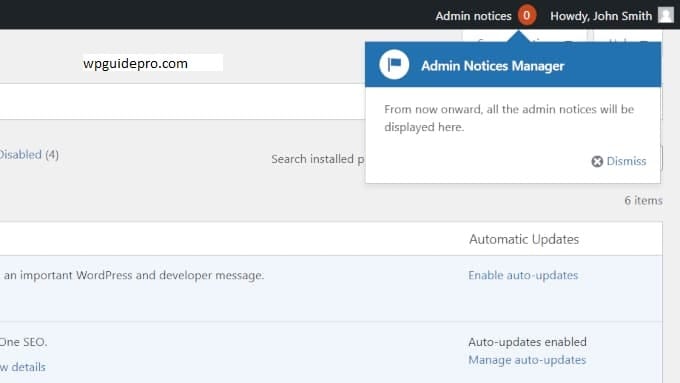
There are some plugins that provide notification center facility without any coding required. Admin Notice Manager plugin is a good option that helps to manage the notices. In this, you can hide admin notices, create categories and schedule them.
After installing Admin Notice Manager, go to the plugin settings and set your notification rules. You can create your custom categories, set display rules for different user roles, and check all notifications in one place.
WP Admin UI Customize plugin is another option. With this plugin you can change elements of the admin interface and create custom notification areas. This plugin provides more flexibility, in which you can change the position and design of notifications.
Method 2: Creating a Custom Notification Center
If you know how to use PHP a little bit, you can create your own notification center. This way you can decide where to display your notifications and how they work.
For this you have to write a little code in the functions file of your WordPress theme. Or if you want, you can also create a custom plugin.
First of all, you have to create a new admin page where all notifications are displayed in one place. Its code is given below which you can use.
function add_notification_center_menu() {
    add_dashboard_page(
        'Notification Center',
        'Notifications',
        'manage_options',
        'notification-center',
        'display_notification_center'
    );
}
add_action('admin_menu', 'add_notification_center_menu');
Now create a function that will show your notification center content. This function will look like this:
function display_notification_center() {
    echo '<div class="wrap">';
    echo '<h1>Notification Center</h1>';

    // System updates show karne ke liye
    echo '<div class="notification-section">';
    echo '<h2>System Updates</h2>';
    display_system_notifications();
    echo '</div>';

    // Custom notifications show karne ke liye
    echo '<div class="notification-section">';
    echo '<h2>Site Notices</h2>';
    display_custom_notifications();
    echo '</div>';

    echo '</div>';
}
Method 3: Enhancing the Default Dashboard
WordPress has some built-in dashboard widgets that you can change according to your needs. Using them, you can create your own notification center, without creating a new system. This way you can display notifications according to your needs.
Creating a Custom Notification Widget You can create a custom widget that displays notifications by combining them from different sources. Its code is given below:
function add_notification_widget() {
    wp_add_dashboard_widget(
        'notification_center_widget',
        'Site Notifications',
        'notification_center_widget_content'
    );
}
add_action('wp_dashboard_setup', 'add_notification_widget');
This code creates a new box that appears in your WordPress dashboard with the name of Site Notifications.
Making the Design of Notification Center Better
Whichever method you use, if the design is good then it will be easy to use. You can display every type of notification with a different color or icon by using CSS. Below are some simple CSS rules:
.notification-urgent {
    border-left: 4px solid red;
    background-color: lightpink;
}

.notification-info {
    border-left: 4px solid blue;
    background-color: lightblue;
}

.notification-success {
    border-left: 4px solid green;
    background-color: lightgreen;
}
The advantage of this is that the user immediately understands which notification is urgent and which is just for information.
More Ways to Clean Up and Customize Your Admin Area
There are some default boxes in the WordPress dashboard, such as “WordPress Events and News”, “At a Glance”, and “Quick Draft”. If these are not useful to you, you can remove them so that the dashboard looks clean.
To remove these widgets, use the code given below:
function remove_dashboard_widgets() {
    remove_meta_box('dashboard_primary', 'dashboard', 'side');
    remove_meta_box('dashboard_secondary', 'dashboard', 'side');
    remove_meta_box('dashboard_quick_press', 'dashboard', 'side');
}
add_action('wp_dashboard_setup', 'remove_dashboard_widgets');
This code will remove those boxes from the dashboard which are not necessary.
Customizing the Admin Menu You can reorder, rename, or hide the admin menu as per your wish. This makes navigation simple and only those options are visible which are used frequently.
For this, WordPress’s admin_menu hook is used. With this hook, you can change the order of menu items, change their name, or hide the menu for any role.
Different Dashboard Experience for Every Role Every user has a different role. As an editor does not need to manage plugins, and an author only writes posts.
For this reason, it is more useful to display the admin panel differently for each role.
WordPress’ capability system allows you to check what a user can do. Show menu items, dashboard widgets, or notifications accordingly.
Adding your branding
You can remove the default design of WordPress and use your company or website’s logo, colors, and favicon. This makes the dashboard look more professional and the brand look remains consistent.
Admin_head hook is used for this, where you can add your CSS. You can change the logo of the login page, change the style of the admin bar, or make the color of the entire dashboard according to your brand.
Transform Your WordPress Admin Experience
If your notification center is set up properly, running a WordPress website becomes very easy. You can install a plugin or create your own system, but if all notifications are displayed in one place, work becomes easy. The dashboard remains clean and no important thing is missed.
When you use the notification center in conjunction with other parts of the admin, the dashboard looks even easier and nicer. It takes some time to set up initially, but later work is done quickly. Mistakes are reduced and team members work well together.
Before you start, see what problems you are having with notifications. Then think whether you want to use a plugin or write your own code whichever is easier for you and also useful in the future
