

Ever since Threads launched in 2023, I have been looking for a way to automatically share auto posts from WordPress blog in different ways.
Initially, I used to share every post manually, but this was taking a lot of time as I have to handle multiple websites and social media accounts.
Writing the summary of the post, finding the right hashtags and emojis, and formatting all this took a lot of time. Because of this, I was not getting time to grow the business.
Then I thought of finding a way that makes all this work fast and automatic. After a little research, I found a plugin that can automatically post to threads from WordPress without any coding.
In this guide, I will share simple steps by which you can connect your WordPress site to avoid boring manual posting
Want to stay ahead with AI-driven change footer in WordPress insights and stay updated with the latest trends? Subscribe for daily search insights at wpguidepro.com to improve your WordPress strategy
Table of Contents
Why Share Your Content on Threads?
The best way for even small businesses to grow is to build their own loyal community. An easy way to do this is to talk directly to your users on social media like X (Twitter), Facebook, Instagram, LinkedIn, and now Threads.
Threads was launched in 2023 by Meta (formerly Facebook) and competes with X (formerly Twitter).
In just 5 days, Threads gained over 100 million users making it the fastest growing app in the world. As of this writing, over 320 million people were using every month.
When so many people are on Threads, it is certain that your customers will also be active there!
Threads and X have some similarities, but there are some important differences:
You can write 500 characters on Threads with a free account, while X has only 280.
- There are no ads on Threads yet.
- There is no direct message option.
- The interface is simple and clean.
- Only 1 tag can be added to each post.
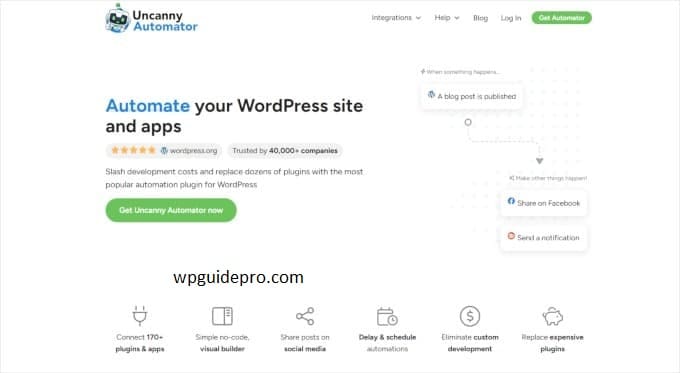
The best thing is that you can connect your WordPress site with Threads easily and at a low cost. Like using a plugin called “Uncanny Automator”, you can automatically share your WordPress blog posts on threads without doing anything manually.
I do the same on my small business website. As soon as a new blog post is published, it gets automatically shared.
I also sometimes share tips with Automator like ways to buy and sell secondhand clothes. In this article, I will tell you step-by-step how you can do this on your WordPress site
Step 1: Install Uncanny Automator on Your Website
In this tutorial, I will show you how to automatically post to threads from WordPress using the Uncanny Automator plugin.
Uncanny Automator is the best automation plugin for WordPress that lets you create auto workflows without any coding. This plugin connects with Facebook, LinkedIn, Threads, X (Twitter) and many other apps.
If you want to go into more detail, you can also read “Uncanny Automator review“.
How does Uncanny Automator work? When you connect your WordPress site to Automator, it automatically shares your blog posts to threads while you are busy writing content on your WordPress.
Apart from threads, this plugin also connects with OpenAI. This means that the post content for your will also be automatically generated without you having to write it manually. We just give some basic guides to OpenAI, and it creates the post itself.
What do you need for this tutorial?
- Free version of Uncanny Automator plugin
- OpenAI API key (this is available for free)
- If you want to make more posts, you can also take the paid version – which gives unlimited post credits.
Step-by-Step:
- Go to WordPress dashboard.
- Click on Plugins » Add New on the left side.
- Search “Uncanny Automator“.
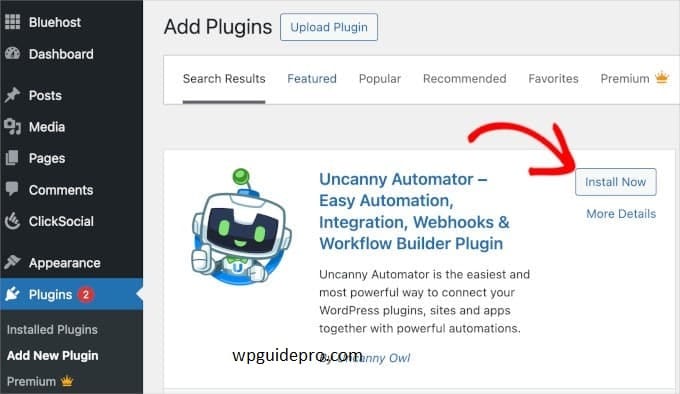
- When you find the plugin, click on Install and then Activate.
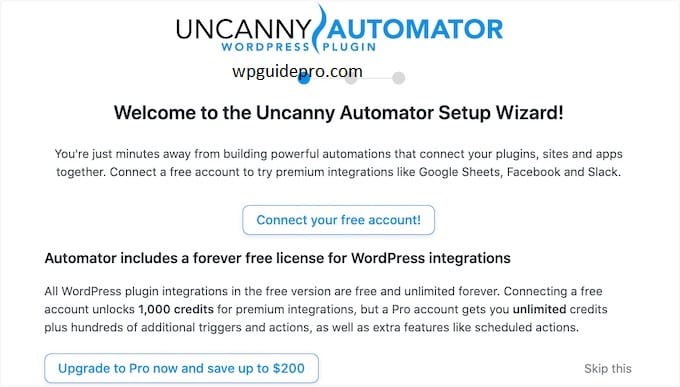
- After this the setup wizard will open which shows the instructions on the screen.
If you want, you can continue with the free account or you can also take the paid version. Just keep following what is written on the screen, the setup will be complete.
If you need help installing the plugin, you can also see the guide “how to install WordPress plugin”.
Step 2: Connect WordPress to Threads
Once you have completed the setup of Uncanny Automator, the next step is to connect your Threads account with the WordPress site.
But before that, make sure that your account is already created and ready.
How to connect Threads with WordPress?
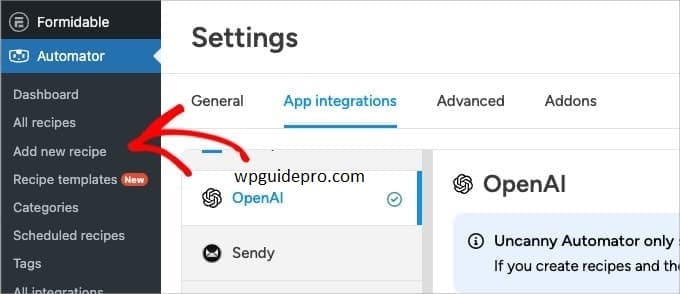
Go to the WordPress dashboard.
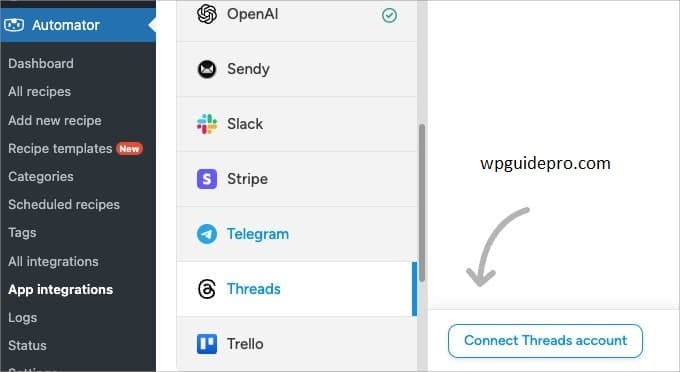
Click on Automator » App Integrations.
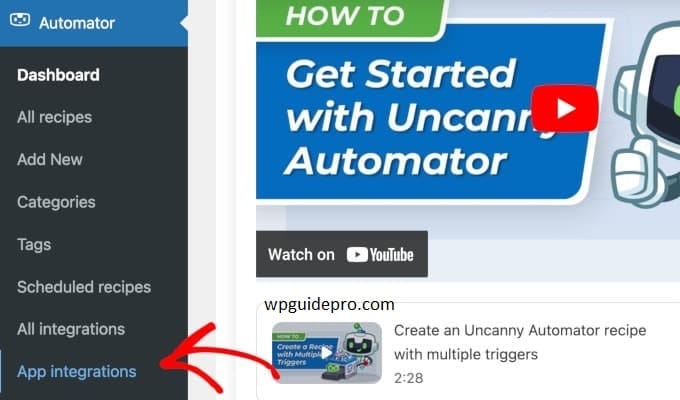
There you will see a list of integrations on the left side.
Scroll down in that list until you find “Threads”.
When you click on “Threads”, the detailed section of the integration will open.
Go down and click on the “Connect Threads account” button.
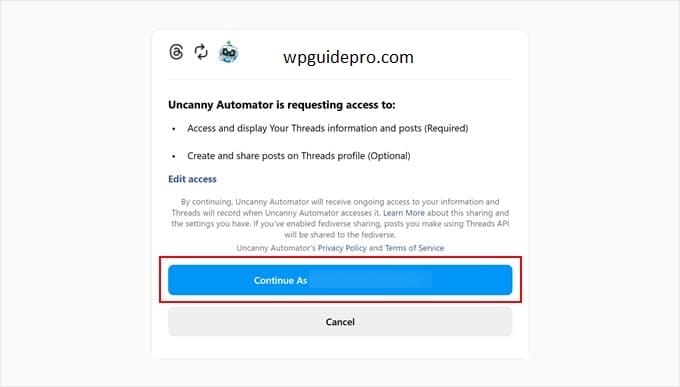
Now you will be sent to the website where you will need to login with your Threads account.
Login and allow that unknown Automator to use your Threads account.
When you allow the connection, you will be back to your WordPress site.
Now you can use Threads integration in Automator’s recipes – meaning your blog posts will be automatically shared on Threads!
Step 3: Connect to OpenAI
Now we have to connect OpenAI, which we will use to create content for posts shared on Threads.
Note: If you have not yet created an OpenAI account, first go to OpenAI's website and create a free account.- How to connect OpenAI with Uncanny Automator?
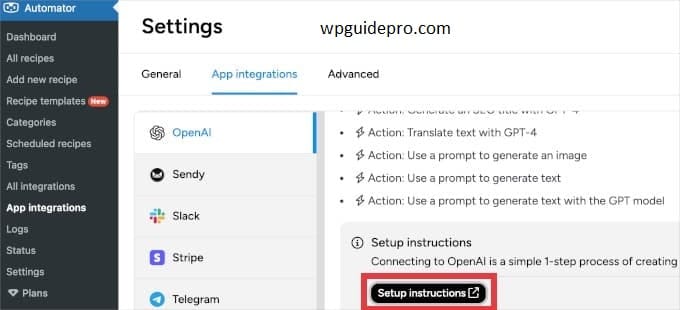
- Now you are on the Automator » App Integrations page.
- Scroll down to OpenAI in the left side menu and click on it.
- After that you will see the button with “Setup instructions” – click on it.
- This will give you a step-by-step guide on how to connect OpenAI.
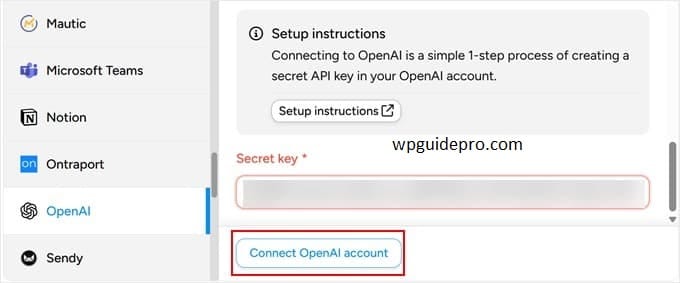
Important: Your OpenAI API account must be funded – i.e. have some balance. This is separate from ChatGPT account.- How to add API Key? Once you generate API key from your OpenAI account,
- copy that key.
- Come back to WordPress and paste it in the ‘Secret key’ box.
- Then click on ‘Connect OpenAI account’.
- That’s it! Now your OpenAI account is connected with Automator.
Step 4: Create a Trigger to Post From WordPress to Threads
Now that Threads and OpenAI accounts are connected, we will create an automation that will automate posting.
This automation is called a “recipe” in Uncanny Automator.
What will this recipe do? Whenever a new post is published on your WordPress blog, then:
- First OpenAI will create a short summary of that post,
- Then that summary will be automatically shared on Threads.
How to create a recipe?
- Go to WordPress dashboard
- Click on Automator » Add New Recipe from the menu
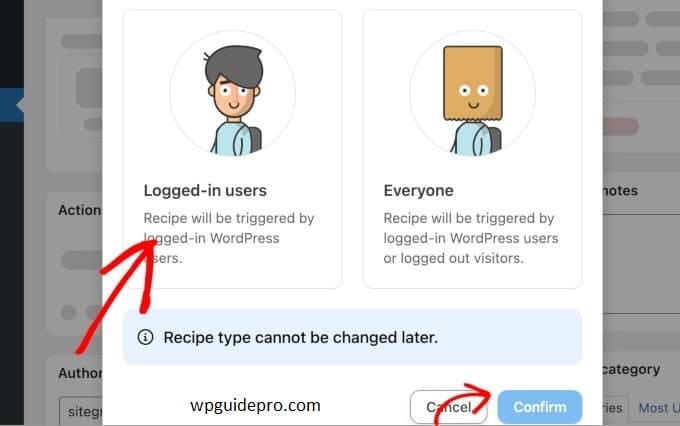
Step 1: Choose Recipe type
- When the screen opens, you will be asked what kind of recipe it will be.
- Because this automation will run only when WordPress user publishes the post, so choose ‘Logged-in users’
- Then click on ‘Confirm’
Step 2: Name the recipe
- Type the name of the recipe.
- Example: “Share new blog posts on Threads”
Step 3: Set Trigger (i.e. when the automation starts)
- Trigger means the task on which the automation starts
- Choose WordPress, because we want automation on WordPress posts
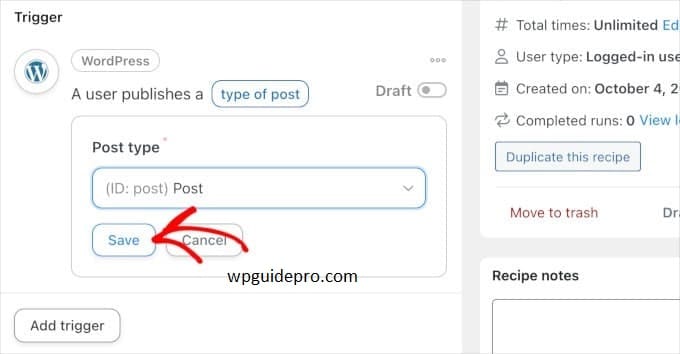
Step 4: Set Trigger condition
- When the options come, click on “A user publishes a post”
- i.e. whenever a user publishes a new post
- Then choose “Post” from ‘Post type’ (this will run only on blog posts, not on pages)
- Then click on the ‘Save’ button
That’s it! Now your trigger is ready. Now in the next step we will set the action in which OpenAI will create the content and post it on Threads.
Step 5: Set Up Actions for Posting to Threads From WordPress
Now we have to add actions inside the recipe. Actions tell us what should happen when a new blog post is published.
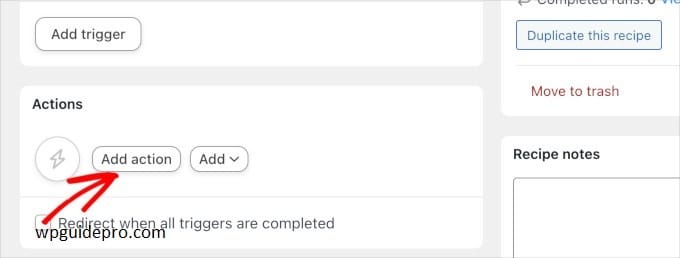
Step 1: Add action
- Go to the “Actions” section of the recipe
- Click on the ‘Add action’ button
Step 2: First action Create content with OpenAI
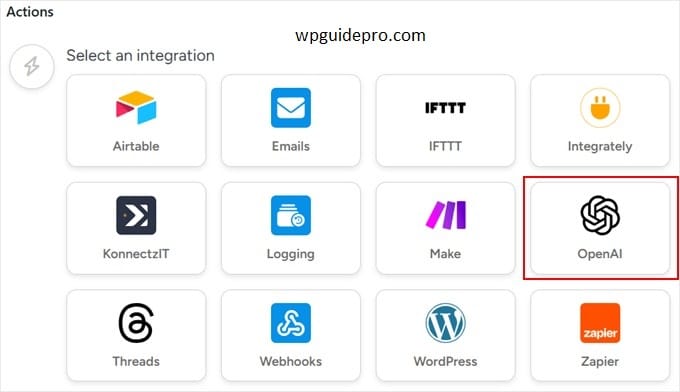
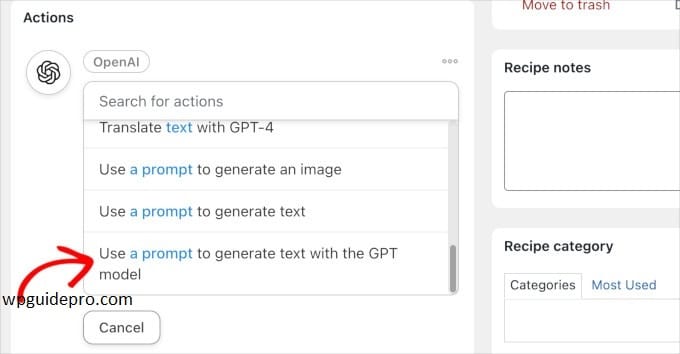
- Choose OpenAI from the Action list
- Then choose: “Use a prompt to generate text with the GPT model”
- This option gives you full control to create your custom text.
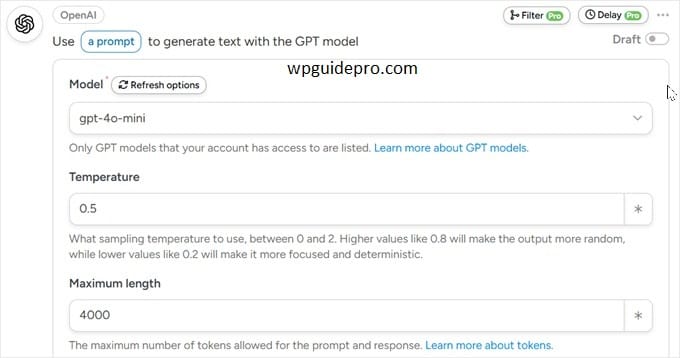
Step 3: Fill in the fields of OpenAI
- Model: choose gpt-4o-mini (if available)
- Temperature: write 0.5 (this creates balance)
- Max length: write 4000 (this allows longer text)
- System message: Small, not needed in this example
- Prompt: Write here what you want to say to OpenAI
Example of Prompt You can write like this:
You are a professional social media expert. Give me a short and engaging summary of this blog post which can be posted directly on threads. No human will check it again. This is the title of the post: {{Post title}}. And this is its content: {{Post content (raw)}} Note: You can add {{Post title}} and {{Post content (raw)}} using the asterisk (*) icon next to the prompt field.After writing the prompt, click on the Save button.
Step 4: Second action post on Threads
- Again click on ‘Add action’
- This time choose ‘Threads’ integration
- Then select ‘Create a thread post’ option
Step 5: Add content for Threads post
- Click on the asterisk (*) icon in the Content field
- From there go to OpenAI actions and select ‘Response’ token
- (This is the same text that OpenAI created)
- Now you can add some more text like:
- Read more:
- Then click on the asterisk and add ‘Post URL’ token as well
Step 6: Add image (optional)
- If you want to add image post as well
- Click on the asterisk in ‘Image URL or Media library ID’ field do it
- Then choose the ‘Post featured image URL’ token
- This will add the featured image of your blog post to the Threads post.
Step 7: Make the recipe live
- Now when everything is set
- The “Draft” toggle will be visible on the right side
- Click on it till it goes live (turns blue)
What will happen now?
- Whenever your new blog post is published:
- OpenAI will create its summary
- And the post will be automatically posted on threads
- Save time Earlier it used to take ~15 minutes to manually share each post on threads
Now this one trick will automate your work If there are 4 posts every month, you will save ~12 hours in a year!
Bonus: How to Publish Automated, Recurring Posts on Threads
If you use the Pro version of Uncanny Automator then:
- You get more triggers and actions
- You can do unlimited posting
- And you also get many extra features
Schedule Integration
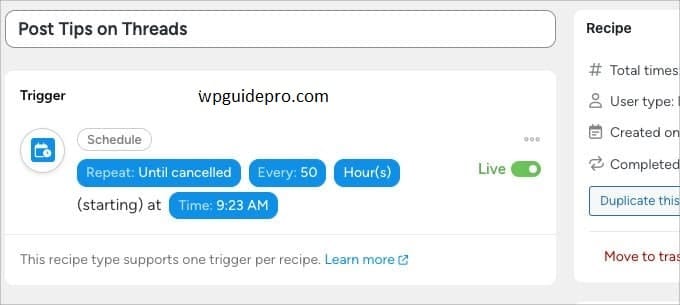
The Pro version has a feature called Schedule Integration With this, you can automatically run recipes repeatedly like every 2 days, every week, etc.
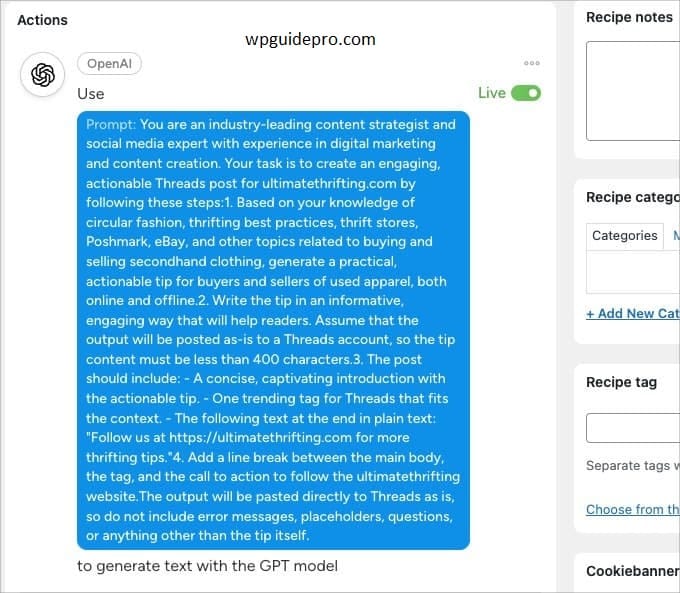
Example: auto post on threads We have created a recipe which posts on threads every few days.
These are tips about thrifting and resale.
This means we can stay connected with our followers without doing anything manually.
This recipe happens in three parts:
- Trigger The schedule is set (e.g. every 3 days)
- And when that time comes, the recipe starts
First Action: Creating content from OpenAI is given a prompt
It automatically creates content which we will post on threads
Second Action: Posting on threads The content created by OpenAI gets posted on threads
- If you want, you can also add an image to the post
- Not for all industries This recipe is not suitable for every business, but:
- If your work is related to social media or blogging hai
- So this recipe can save you a lot of time
In the future, when OpenAI API starts taking content directly from the website, then this system will become even more powerful.
If you want to:
- Put social media feed on your website
- Or see the best social media plugins for WordPress
- Then you can see that too.

Note: This article is written by Kelly, who runs the Ultimate Thrifting blog.She guides people how to earn money by thrifting and selling secondhand clothes.
