

Comments allow people to give their opinion on your website content. That’s why we believe that the design of comments should be user-friendly and good looking. A few days ago, a user asked us how to add jQuery tooltips to WordPress comment form. We thought this could be useful for others as well. In this tutorial, we will show you how to add jQuery tooltips to WordPress comment form.
Want to stay ahead with AI-driven WordPress insights and stay updated with the latest trends? Subscribe for daily search insights at wpguidepro to improve your WordPress strategy!
Table of Contents
Why Add jQuery Tooltips?
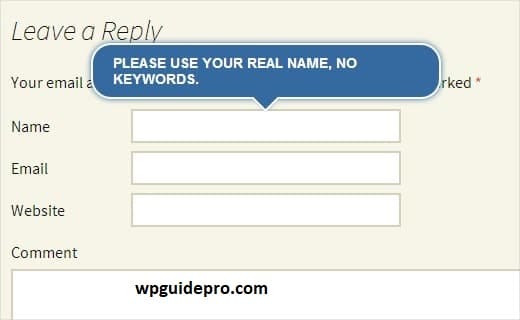
A tooltip appears when a user hovers over an object. It usually gives a small information about that object. In this tutorial, we will add jQuery tooltips so that we can see tips such as, Please use your real name in comment form fields.
Adding jQuery tooltips gives better user experience and the form also looks better.
How to Add jQuery Tooltips
First of all, create a new folder on your computer’s desktop and name it wpb-comment-tooltips. Now create three different files inside this folder:
wpb-comment-tooltips.php
wpb-tooltip.css
wpb-tooltip.js
Use a simple text writing program like Notepad to create these files. Once these files are created, open the file named wpb-comment-tooltips.php. Now copy and paste the code given below into it.
<?php
/**
Plugin Name: WPGuidePro Comment Form Tooltips
Description: A simple jQuery-powered plugin to add helpful tooltips to the WordPress comment form.
Version: 1.0
Author: WPGuidePro Team
Author URI: https://www.wpgudepro.com
License: GPL2
*/

// Load tooltip script and style only when the comment form is visible
add_action( 'comment_form_before', 'wpgp_comment_tooltips' );

function wpgp_comment_tooltips() {
    wp_enqueue_script('wpgp-tooltip-jquery', plugins_url('/wpb-tooltip.js', __FILE__ ), array('jquery-ui-tooltip'), '', true);
    wp_enqueue_style('wpgp-tooltip-css', plugins_url('/wpb-tooltip.css', __FILE__), false, null);
}

// Customize comment form fields by adding tooltip text using the title attribute
function wpgp_alter_comment_form_fields($fields){
    global $commenter, $req, $aria_req;

    // Email field with tooltip
    $fields['email'] = '<p class="comment-form-email"><label for="email">' . __( 'Email', 'twentythirteen' ) . '</label> ' .
        ( $req ? '<span class="required">*</span>' : '' ) .
        '<input id="email" title="Your email is safe with us. Read our privacy policy." name="email" type="text" value="' . esc_attr( $commenter['comment_author_email'] ) .
        '" size="30"' . $aria_req . ' /></p>';

    // Website/URL field with tooltip
    $fields['url'] = '<p class="comment-form-url"><label for="url">' .
        __( 'Website', 'twentythirteen' ) . '</label>' .
        '<input id="url" name="url" title="Add your website or a social media profile link." type="text" value="' . esc_attr( $commenter['comment_author_url'] ) .
        '" size="30" /></p>';

    // Name field with tooltip

    $fields['author'] = '<p class="comment-form-author">' .
        '<label for="author">' . __( 'Name', 'twentythirteen' ) . '</label> ' .
        ( $req ? '<span class="required">*</span>' : '' ) .
        '<input id="author" title="Please use your real name, not keywords." name="author" type="text" value="' . esc_attr( $commenter['comment_author'] ) .
        '" size="30"' . $aria_req . ' /></p>';

    return $fields;
}

// Apply the custom field changes to the default comment form

add_filter('comment_form_default_fields','wpgp_alter_comment_form_fields');
?>
First, we created a plugin header with the plugin name and a brief description. Then we loaded our JavaScript and CSS files (if you want, you can check out our guide on how to add JavaScript and styles to WordPress).
We also made sure that these files are only loaded when the comment form is on the screen.
Then we slightly modified the default comment form and added a title attribute to the input fields. The title is the message that appears inside the tooltip when the user mouses over the field.
As written in the author field:
title=“Please use your real name, no keywords.”
Now that the plugin file is created, we have to add some jQuery code. For this, open the wpb-tooltip.js file and paste the below code inside it:
(function($) {
  $("#commentform").tooltip({
    position: {
      my: "center bottom-10",
      at: "center top",
      using: function(position, feedback) {
        $(this).css(position);
        $("<div>")
          .addClass("arrow")
          .addClass(feedback.vertical)
          .addClass(feedback.horizontal)
          .appendTo(this);
      }
    }
  });
})(jQuery);
In this code, #commentform is a selector where jQuery displays tooltips. And .tooltip is the part where we have defined the position of the tooltip.
Now the last step is to add some CSS code inside the wpb-tooltip.css file. Just copy the below code and paste it in this file:
.ui-tooltip,
.arrow:after {
  background: #ff4e00; /* wpguidepro primary color */
  border: 2px solid #ffffff;
}

.ui-tooltip {
  padding: 10px 20px;
  color: #ffffff;
  border-radius: 20px;
  font: bold 14px "Helvetica Neue", sans-serif;
  text-transform: uppercase;
  box-shadow: 0 0 7px #ff4e00;
  max-width: 350px;
}

.arrow {
  width: 70px;
  height: 16px;
  overflow: hidden;
  position: absolute;
  left: 50%;
  margin-left: -35px;
  bottom: -16px;
}

.arrow.top {
  top: -16px;
  bottom: auto;
}

.arrow.left {
  left: 20%;
}

.arrow:after {
  content: "";
  position: absolute;
  left: 20px;
  top: -20px;
  width: 25px;
  height: 25px;
  box-shadow: 6px 5px 9px -9px #ff4e00;
  transform: rotate(45deg);
}

.arrow.top:after {
  bottom: -20px;
  top: auto;
}
If you want, you can change this CSS file as per your wish.
That’s it. Now you have created a plugin that adds jQuery tooltips to the WordPress comment form. Now you just have to upload the wpb-comment-tooltips folder from your desktop to the plugins folder of WordPress. For this, you can use FTP software like FileZilla. The path to upload will be: /wp-content/plugins/
