

If you want your products to be well visible on the internet and more people to see them, then it is important to add codes like GTIN, ISBN and MPN to your WordPress site
These are special codes that identify each product differently. When these codes are added, search engines like Google understand your product well and show people the correct information.
Whether you are running an online store like WooCommerce, or just want to display products on a simple website, this guide will explain everything to you easily.
This way more people will see your website and traffic will also increase.
Want to stay ahead with AI-driven in WordPress insights and stay updated with the latest trends? Subscribe for daily search insights at wpguidepro.com to improve your WordPress strategy.
Table of Contents
Why Add GTIN, ISBN, and MPN Schema in WooCommerce and WordPress
Before you get started, it’s important to understand why these codes are important.

Better Product Search
GTIN (Global Trade Item Number), ISBN (International Standard Book Number), and MPN (Manufacturer Part Number) are special codes that identify your product.. Search engines like Google use these codes to show people the correct product result. When you use these codes, your product is more likely to appear in results like Google Shopping.
Fulfilling Google’s Requirements
If you want your products to appear in Google Shopping ads, it’s important to provide these codes. If this information is missing then Google will not show your products in search or ads.
Get more clicks
When your product information is shown correctly and clearly, people trust your product more. This increases the chances that they click on your listing.
Using these codes is good for SEO and in today’s competitive era, it has become necessary.
Method 1 Add GTIN, ISBN, and MPN Schema to WordPress Website
If you have listed products on your WordPress site or you write reviews of different products on your blog, then it is easy to manually add GTIN, ISBN or MPN data. Follow the steps given below:
Step 1: Select the Plugin To save time, use a plugin that helps in adding structured data. Plugins like Schema Pro or All In One Schema Rich Snippets are easy to use. Just install the plugin and activate (on).
Step 2: Set Schema Settings After installing the plugin, go to its settings. From there select the schema type Product. This will create the correct schema for every product page.
Step 3: Add GTIN, ISBN and MPN Now edit your posts or pages. For each product, find the schema plugin fields where you can enter GTIN, ISBN and MPN data. This data will be added to the structured data of the page.
Step 4: Test the Schema When you save everything, use Google’s Rich Results Test tool. This will help you check whether your GTIN, ISBN and MPN data has been added correctly or not. If everything is correct, your product will show better in Google search results.
Method 2 Add GTIN, ISBN, and MPN Schema to Your WooCommerce Store
If you are running a WooCommerce store, then adding GTIN, ISBN or MPN schema is also important, because it helps your product pages to show well in Google.
Step 1: Install WooCommerce Schema Plugin
There are some special plugins for WooCommerce users that make the product schema better. Popular plugins include:
• Yoast’s WooCommerce SEO Plugin
• WooCommerce Product GTIN Plugin Install any of these plugins and activate (on).
Step 2: Add GTIN, ISBN, MPN to Product Data
Once the plugin is installed, go to your WooCommerce products. There in the Product Data section you will find fields for GTIN, ISBN, and MPN.
Enter these unique codes for each product.
Step 3: Update via CSV
if there are too many products If there are too many products, it can be difficult to manually add data for each product.
So use WooCommerce’s CSV Import/Export feature:
- Export your product data to a CSV file.
- Add GTIN, ISBN, and MPN data to this file.
- Upload the file again to WooCommerce so that all the products are updated.
Step 4: Check the Schema
Finally, check your product pages with Google Rich Results Test or Schema Markup Validator. This will let you know whether your schema is working correctly according to Google’s rules or not.
Bonus Add Your Products to Google Shopping
Once you add GTIN, ISBN, and MPN, you are now ready to use a powerful eCommerce tool Google Shopping. This will help you reach your products to people who are already searching for those things.
Step 1: Create a Google Merchant Center Account
Create an account on Google Merchant Center (visit the Google Merchant Center website). Then sync it with your WooCommerce store. You can use the Google Listings and Ads plugin for this.
Step 2: Upload Your Product Feed
WooCommerce users can create a product feed using a plugin like Product Feed Pro. This feed contains GTIN, ISBN, and MPN data.
Upload this feed to Google Merchant Center.
Step 3: Correct your product data Keep
Your product title, description, and codes (GTIN, ISBN, MPN) correct and same. This will make your listing look better in Google Shopping. Chances of getting clicks increase (CTR improves).
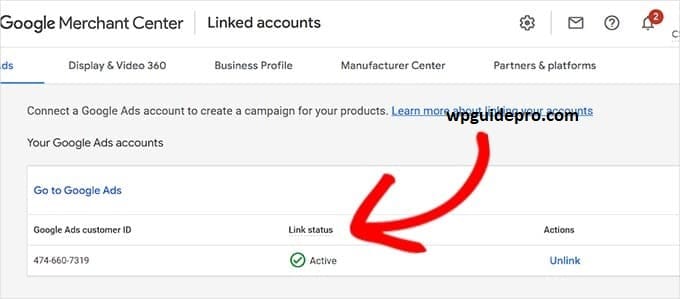
Step 4: Start Google Ads Campaign
When your product feed is approved, link Merchant Center with Google Ads. Then create a Shopping campaign. This will allow you to advertise your products and drive traffic to your WooCommerce store
Create Better Product Listings with Structured Data
Adding GTIN, ISBN and MPN codes is a simple but powerful way to make your products more visible on search engines like Google. This helps people trust you more and also fulfills the rules of Google Shopping and rich results.
Whether you are using WordPress or WooCommerce, you can easily make your products visible on Google by following the steps given above.
Now take the first step and start inserting structured data.
And if you want to make this process easier, use a schema plugin that is best for your website
