
Your WordPress custom dashboard logo is the place where all the work happens.
But imagine if you put your own logo there, how much more personal and professional would it look?
When you add your custom logo to the dashboard, it gives your website a new, smart look.
If you are creating a website for a client, this small customization can impress them even more.
A little branding will make your WordPress admin area match your company or brand.
In this guide, we will tell you two ways:
- How you can add your own dashboard logo
- And if you want, you can also remove the original WordPress logo
That means you will have full control!
Want to stay ahead with AI-driven in WordPress insights and stay updated with the latest trends? Subscribe for daily search insights at wpguidepro.com to improve your WordPress strategy.
Table of Contents
What Is a Custom Dashboard Logo and Why Add One?
When you add your custom dashboard logo, the normal WordPress logo is removed. This logo is usually on the login page and some parts of the dashboard.
This is a small change, but it has a big impact. This makes the WordPress dashboard look like your brand or project.
There are some simple reasons why you should add a custom logo:
• Brand match: If you have a business, the dashboard will also look like your colors and style.
• Professional look: If you are building a website for clients, adding their logo makes the site look more professional.
• Client likes it: When client logs in, he feels that this dashboard is made for him. Using it also becomes easy.
Now that we understand why custom logo is important, let’s see how to install it step by step.
Method 1 Adding a Custom Dashboard Logo Using a Plugin
If you don’t know how to edit code, don’t worry! Installing a plugin is the easiest and safest way to change your dashboard logo.
Step 1: Install the WP Custom Admin Interface plugin
• Go to your WordPress dashboard.
• Click on Plugins, then go to Add New.
• Search for: WP Custom Admin Interface
• When you find it, click on Install Now, then click on Activate.
Step 2: Set the plugin settings After the plugin is on, do the following:
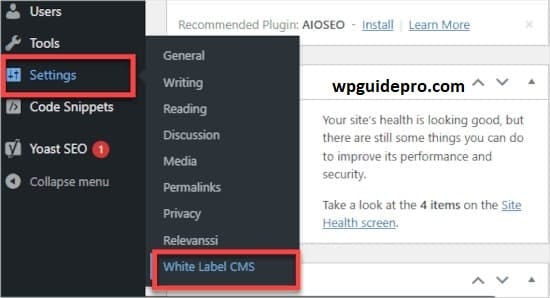
- Go to Settings and click on WP Custom Admin Interface.
- Upload your logo in the Branding or Login Page area.
- Set the size of the logo so that it appears well on the login page or dashboard.
Step 3: Save
Click on Save Changes
Refresh the dashboard.
Now the WordPress logo has been removed and your own logo is visible there
Why should you install a plugin?
• It is very easy, especially for new people.
• It works fast, and you don’t have to touch the code.
• With other plugins like White Label CMS or Ultimate Branding, you can also change the colors, and add other things as well like custom boxes or widgets.
Method 2 Manually Adding a Custom Dashboard Logo in WordPress
If you are a little tech savvy and don’t want to install a plugin, you can manually change the WordPress dashboard logo using simple code.
Step 1: Get your logo ready
First of all, design your custom logo whether you make it yourself or get it made from a designer.
Note:
- Size should be 250 x 250 pixels
- Format should be .png or .jpg
Step 2: Upload the logo
Go to the WordPress dashboard and open Media > Library
Upload your logo from there
After uploading, copy the URL of that image. you will need it in the next step
Step 3: Open the theme file
From the dashboard sidebar, click on Appearance > Theme Editor
Find the functions.php file from the left side. If possible, use the child theme, so that your code remains safe in future updates
Step 4: Add custom code
Now copy the code below and paste it at the end of functions.php do:
function custom_dashboard_logo() {
    echo '<style type="text/css">
        #wp-admin-bar-wp-logo > .ab-item .ab-icon {
            background-image: url("YOUR_IMAGE_URL_HERE") !important;
            background-size: cover;
        }
    </style>';
}
add_action("admin_head", "custom_dashboard_logo");
Where it is written “YOUR_IMAGE_URL_HERE“, paste the URL of your logo which you copied in Step 2.
Step 5: Save and refresh
Press the Update File button
Then reload your admin dashboard
If everything is done correctly, the default WordPress logo will be gone, and your custom logo will be visible in its place
Alternative Removing the WordPress Logo from the Admin Dashboard
How to remove WordPress logo (easily) If you don’t want WordPress logo in your dashboard, and you just want clean and simple look, then you can easily remove that logo without any plugin.

Step 1: Open the theme file
Go to WordPress dashboard
Click on Appearance > Theme Editor on the left side
Now find and open the functions.php file (in the theme which is running)
Step 2: Copy and paste the code
Copy the code given below and paste it at the end of the file:
function remove_wp_logo() {
    global $wp_admin_bar;
    $wp_admin_bar->remove_node('wp-logo');
}
add_action('wp_before_admin_bar_render', 'remove_wp_logo', 999);
Step 3: Save and check
Click on the Update File button
Then reload (refresh) your dashboard Now the WordPress logo that used to appear on the top must have disappeared
What is its advantage?
- Dashboard looks more simple and clean
- It is perfect for such projects where there is no need for custom branding
Final Thoughts Add Your Custom Touch to WordPress
Customizing your WordPress Dashboard is a great idea. This makes your or your clients’ dashboard feel more personal. You can make quick changes using a plugin, or if you want more control, you can add code to the functions file. Inserting a custom logo is easy not difficult.
If you want more WordPress tips, check out our other guides. Or if you want us to make your site professional and special, contact us. We are ready to help you
