

Losing website security is a bad dream for any website owner especially for the developers who run WordPress websites. WordPress XML-RPC. This feature was created for remote access, but nowadays hackers use it to attack – such as brute force attacks and DDoS attacks.
That is why it is important to disable XML-RPC so that your website remains secure.
In this guide we will tell you:
- What is XML-RPC and how does it work
- Why is it important to disable it
- 3 simple and safe ways to disable XML-RPC
- And finally how to check if it has been disabled correctly or not
Whether you are a WordPress developer or just a website user, this guide is useful for you.
Want to stay ahead with AI-driven change footer in WordPress insights and stay updated with the latest trends? Subscribe for daily search insights at wpguidepro.com to improve your WordPress strategy
Table of Contents
What Is XML-RPC in WordPress?
XML-RPC stands for “XML Remote Procedure Call”. This is a system that connects WordPress with other apps. In the old days, when there was no REST API, XML-RPC was very important – like posting from mobile apps or any remote (door) software.
Why is XML-RPC dangerous?
This feature is useful, but it has also become an easy target for hackers. Below are some problems that occur due to this feature:
Brute Force Attack: Allows many login attempts at a time. This allows hackers to guess the password quickly.
DDoS Attack: Hackers use this to send too many requests to the server so that the site goes down.
Code Injection: If the XML-RPC is an old version or is not properly secured, hackers can insert their dangerous code in it.
If you do not use XML-RPC features (like WordPress mobile app or some Jetpack features), then disabling it is a smart decision.
Method 1: Disable WordPress XML-RPC With .htaccess (Advanced)
.htaccess is an important file within WordPress that controls the server system. If you want to disable XML-RPC at the server level, this method is very robust. But it requires some advanced knowledge.
How to do this?
Step 1: Reaching the server
You can either use an FTP client or login to your hosting control panel to find your WordPress location.
Step 2: Edit the .htaccess file
a. Go to the main WordPress folder (root directory)
b. Open the .htaccess file to edit it
Step 3: Add the following code:
# Disable
<Files xmlrpc.php>
Order Allow,Deny
Deny from all
</Files>
Step 4: Save the changes
After adding the code, save the file and close it.
This code closes all access to the xmlrpc.php file.
But if something goes wrong in the .htaccess file, it can cause problems on the website. So, take a backup of the file before doing this.
When to use it?
When you understand the work of the server and you want strong security for the entire website, then this method is the best.
Method 2: Disable WordPress XML-RPC With a Code Snippet (Recommended)
If you are a developer, adding a small piece of code to the functions.php file is an easy and flexible way to disable XML-RPC. Below are the steps to do this:
Step 1: Open WordPress Dashboard Login to your WordPress admin panel.
Step 2: Navigate to Theme files Click on Appearance > Theme Editor. From there, open the functions.php file of your active theme.
Step 3: Paste the following code:
// Disable
addfilter('xmlrpcenabled', 'returnfalse');
Step 4: Save After pasting the code, click on the “Update File” button to save the changes.
This code completely disables without touching any server file (like .htaccess). This method is best for people who want full control over their site and are looking for a safe solution.
When to use it?
This method is perfect for most developers and site owners
it’s simple and secure.
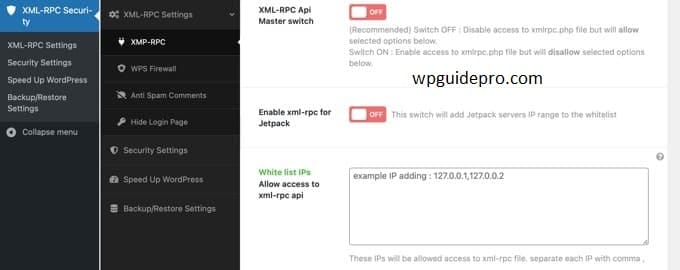
Method 3: Disable WordPress XML-RPC With a Plugin
Not everyone likes to edit code and that’s absolutely fine!
With the help of WordPress plugins, you can easily disable without touching the code.
Step 1: Install the plugin
- Go to the WordPress Dashboard, then click on Plugins > Add New.
- Search for a trusted plugin like “Disable XML-RPC” or “Wordfence Security”.
Step 2: Activate the plugin
- Once the plugin is installed, activate it so that it starts working.
Step 3: Follow the plugin instructions
- Every plugin has its own settings.
- Follow the instructions of the plugin and disable in just a few clicks.
Popular Plugins:
• Disable XML-RPC: Simple and lightweight plugin to disable XML-RPC only.
• iThemes Security: A powerful plugin that has a lot of security tools, and also an option to disable XML-RPC.
When to use it?
This method is best for those who are beginners or who do not like technical work. Plugins are also helpful in managing security settings
Testing That WordPress XML-RPC Is Disabled
When you complete any of the above methods, it is important to check whether XML-RPC has really been blocked or not. Below is a simple way to test:
Step 1: Use an online tool
Go to an XML RPC test website, such as:
- https://xmlrpc.eritreo.it/
- Enter your website URL there and run the test.
Step 2: Check the result
If a message of “blocked” or “disabled” appears there, it means XML RPC has been successfully blocked.
Step 3: Manually check
You can also check manually:
- Open this URL in the browser: https://yoursite.com/xmlrpc.php
- If you see a blank page or an error message, then XML RPC is turned off.
- If XML RPC is still active Then check your method again and follow the steps correctly.
Secure Your WordPress Site Today
Disabling XML RPC is an important step to secure your WordPress site.
Whether you use the server method, insert a snippet of code, or install a plugin each method has its own benefits.
If you follow these steps, you can protect your site from brute force and DDoS attacks.
Security will be strong and the site will be safe.
Once you have done everything, make sure to test whether XML RPC has been disabled correctly or not.
If you are a developer and are handling multiple WordPress sites, this easy and fast solution will save you time and reduce your stress.
Secure your site and focus only on the important work!
