

“How do I make a Lock WordPress Page private for members only?”
This question is often asked by my friends who use WordPress. I also remember when I and my team were building our video membership site on wpguidepro, I too had asked the same question.
The good thing is that this work is done very easily in WordPress.
You do not need any developer, nor do you need to learn coding. You just need the right plugin, and you can easily make the page private for only logged-in users.
I have solved this problem on many people’s websites, so I have found 2 simple ways that work on every lock WordPress site. Let me show you step by step how you can keep your WordPress site or page only for logged in users.
Want to stay ahead with AI-driven WordPress insights and stay updated with the latest trends? Subscribe for daily search insights at wpguidepro.com to improve your WordPress strategy!
Table of Contents
When Should You Require Users to Log In to View a Page?
It is not necessary to lock wordpress every page, but in some cases making users login is a very good way to protect your content.
Here are some examples where making login mandatory is beneficial:
Membership Sites and Online Courses: If you are providing special content, tutorials or training to someone, then login is necessary so that only paid members can see that content.
Private Client Portals: If you are sharing any secret documents, project updates or bills with the client, then you can keep this data safe only by login.
Exclusive Blog Content: Some websites only show special articles, guides or research reports to registered users. This increases the email list and people take more interest.
Community Forums and Discussion Boards: If you are running a forum for members only, then only real members talk there as login is mandatory.
Company Intranet and Team Resources: Many companies use WordPress to show internal documents, training or announcements to their employees. Login keeps all this secure.
If any of these things are on your site, then it is a smart idea to install a login system
Method 1: Require Login to View a Page in Lock WordPress With MemberPress
If you want to show some special pages or posts of your website only to logged in users, then MemberPress is a very good plugin.
With the help of this plugin, you can easily decide who can see your content only members, subscribers or people who subscribe by paying.
In my opinion, this is the best plugin for WordPress to protect content. With this, you can easily lock wordpress pages, but it is necessary to login first.
How to setup MemberPress?
- First of all, install and activate the MemberPress plugin.
(Want to know how to install? See: “How to install a WordPress plugin” tutorial.)
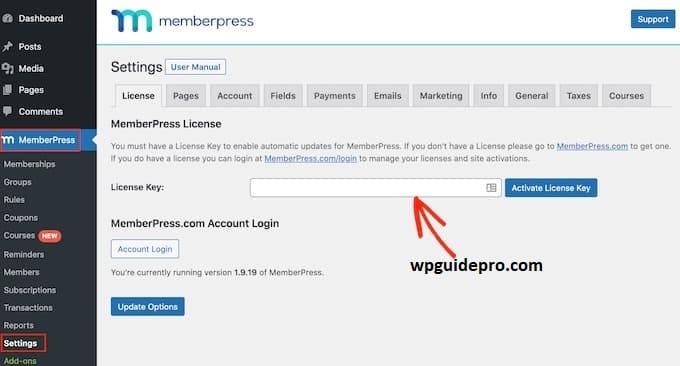
- Once the plugin is activated, go to: MemberPress » Settings.
Paste your license key here (you will find it in your account on the MemberPress website).
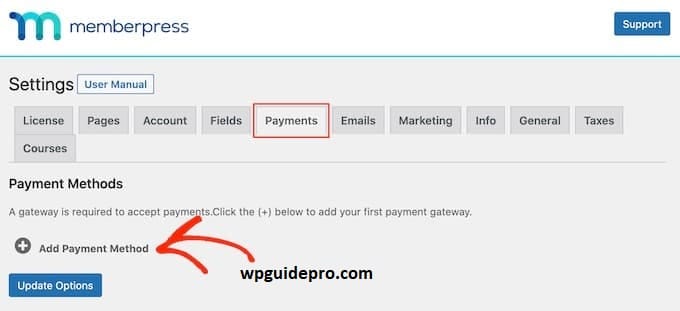
- Now go to the Payments tab and add your payment gateway.
This plugin supports both PayPal and Stripe.
Click: + Add Payment Method
And choose the gateway you want.
(A step-by-step guide to setting up a stripe is also available.)
How to create Membership Levels?
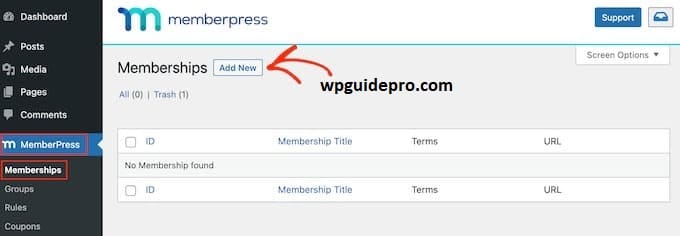
- Go to: MemberPress » Memberships
- Click: Add New
- Write the name and description of your membership.
Then set the price and expiration – such as monthly, yearly or one-time payment.
When everything is ready, click: Publish
You can create as many membership levels as you want.
Content Locking Method
- Go to: MemberPress » Rules
- Click: Add New
- From ‘Protected Content’ choose: A Single Page
- Write the slug or URL of the page you want to protect.
- From ‘Access Conditions’ choose: Member
- And on the side write: logged in
- Meaning: Only users who log in can see this content.
- Go down to ‘Unauthorized Access’ section
- And choose: Show login form
- Then click: Save Rule and Publish
- How to create a Login Page?
- Go to: Pages » Add New
Write a title: Login Here or Unauthorized Access
And add a simple message:
“You cannot view this page because you are not logged in.”
Click the + button and add: Login Form block
(MemberPress automatically adds this block.)
- Add a link below:
“New here? Visit our Sign Up Page to choose your membership plan.”
(The way to add a link is also given in the WordPress guide.)
- When everything is ready, click: Publish
Then copy the URL of this page.
Redirect Unauthorized Users
- Go to: MemberPress » Settings » Pages
- Scroll down: ‘Unauthorized Access’ section
- Check: Redirect unauthorized visitors to a specific URL
- Paste the URL of your login page
- Click: Update Options
- Now when a user visits a restricted page without logging in, he will automatically be redirected to the login page.
Bonus Tip: Show Content Preview
MemberPress has an amazing feature: Excerpts or Previews
You can show a small part of your content (like the first 2 paragraphs of an article) to everyone.
Then you can write:
“To see the full article, take a membership or login.”
This way people get a taste of the content and there is a high chance that they will sign up.
Alternative:
If you want to try a plugin other than MemberPress, a list of the best membership plugins for WordPress is also available.
Method 2: Require Login to View All Pages in WordPress With My Private Site
If you want only logged in users to be able to see your website, then the “My Private Site” plugin is best for you.
This plugin lock WordPress the entire website. Until each person logs in, he will not be able to see any page.
Step 1: Install and activate the plugin
- First of all, go to the WordPress dashboard and
- Click on Plugins » Add New
- Search: My Private Site
- Activate after installing
If you do not know how to install the plugin, then you can see the guide “how to install a plugin in WordPress”.
Step 2: Make the site private After activation:
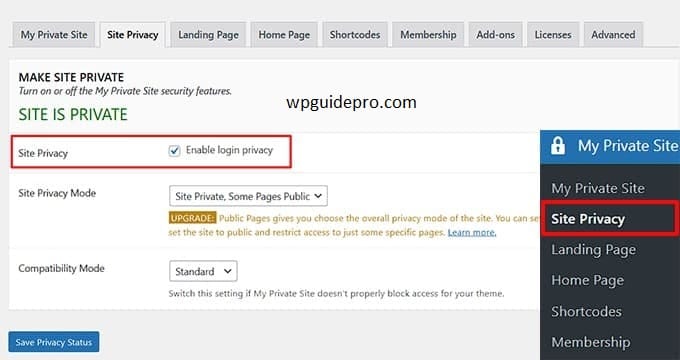
- Go to Dashboard My Private Site » Site Privacy
- There will be a box: Enable login privacy
- Put a check on it
- Then click on the button below: Save Privacy Status
Now whoever visits your site, will have to login first.
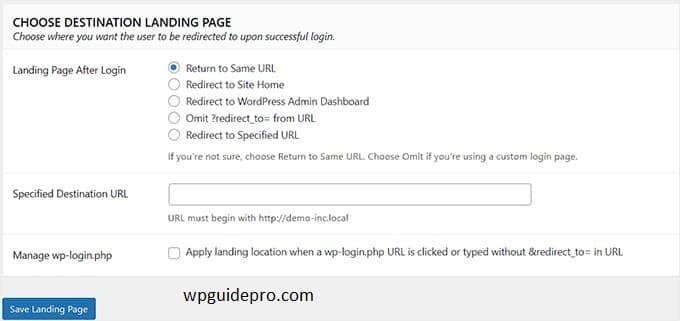
Step 3: Where to send after login?
Now go to the Landing Page section. This decides where the person goes after login.
You have some options:
- The same page from where it came
- Home page
- WordPress dashboard
- Or any URL of your choice
- Select the option and click on the Save Landing Page button.
Step 4: Do you want to keep only the home page public?
If you want everyone to see only the home page, then:
- Go to the Home Page tab
- Check: Allow site home page to remain accessible
- Click: Make Page Public
Now only the home page will be visible to everyone, all other pages open only after login.
Final Result:
- When a user comes to your website, he will have to login.
- If home page is allowed, it will be open for everyone.
- Login is required to view all other pages.
