

If you have ever opened your website in Google Chrome and seen a warning “Not Secure” in the address bar, then you know how strange and stressful it is. It is a red flag not only for you but also for visitors – after which they may not like to stay on your site or avoid buying anything.
Google marks a website as “Not Secure” to inform people that their personal information may be at risk. This can harm your site’s reputation and can also bring down your search rankings.
But don’t worry, the solution to this problem is easy. you just need to understand why this warning appears.
In this guide, we will explain why Google displays the “Not Secure” warning, and give you simple steps to make your website secure and reliable.
Whether you are a website owner, running an online business, or own a small business . This guide is for you. Learn how to protect your site and your visitors, now.
Want to stay ahead with AI-driven WordPress insights and stay updated with the latest trends? Subscribe for daily search insights at wpguidepro.com to improve your WordPress strategy!
Table of Contents

Why Does Google Show “Not Secure” on Your Website?
When you open your website in Google Chrome and it says “Not Secure”, it means that your website is not using HTTPS.
what is HTTPS?
What is HTTPS? The full form of HTTPS is HyperText Transfer Protocol Secure. It is a secure system that protects data between your website and the user’s browser.
Its job is to ensure that when someone logs in and gives their password or payment information, that information remains secure – hackers cannot steal it.
If your website does not have an SSL certificate, Google shows it as unsafe or “Not Secure”.
After seeing this warning, people do not trust the website, nor do they buy anything. This can harm your business, SEO ranking and earning.
The good news is: You do not need to become an expert or IT master – the solution to this problem is simple. Below we will tell you step-by-step how you can make your website secure and remove the label of “Not Secure”
How to Fix the “Not Secure” Warning in Google Chrome
To make your website secure, follow these simple steps so that every visitor gets a safe browsing experience.
Step 1: Get a Free SSL Certificate for Your Website

SSL certificate is necessary so that your website runs on HTTPS.
Some hosting companies charge money for SSL, but there are some that provide it for free like Let’s Encrypt.
How to get Free SSL:
- Check whether your hosting company (like Bluehost or SiteGround) provides free SSL or not.
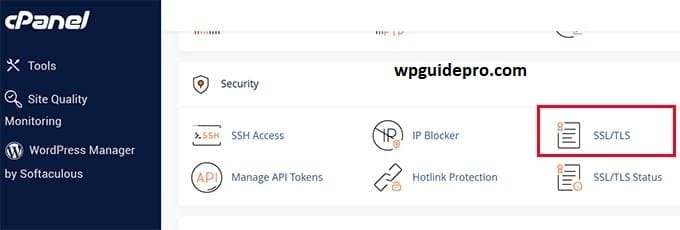
- Login to your hosting account.
- There, find the option of SSL/TLS or Security Settings.
- Enable SSL for your domain – it can be done with a few clicks.
- After SSL is installed, your website will be converted to HTTPS. But there is still some work left!
Step 2: Update WordPress URLs to HTTPS
Even after installing SSL, some content of WordPress website is running on HTTP.
How to fix this:
- Login to WordPress dashboard
- Go to Settings > General from the left side
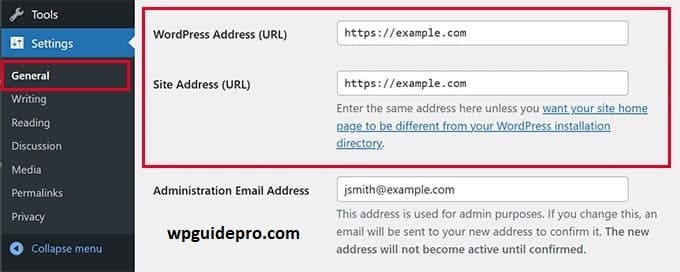
There are two fields:
- WordPress Address (URL)
- Site Address (URL)
- Change both of these from http:// to https://
- Press Save Changes
Now your site will have been converted to HTTPS for quite some time.
Step 3: Fix the issue of Mixed Content
Sometimes some images, scripts or CSS files are still being loaded via HTTP — this is called Mixed Content.
There are two ways to fix this:
Using a Plugin:
From the dashboard, go to Plugins > Add New
- Search for “Really Simple SSL”
- Install and activate it
- This plugin will automatically convert HTTP files to HTTPS
Manually:
- Open your site and right-click on Inspect > Console tab
- See which files are being loaded via HTTP
- Change their links to https:// by going to theme files or database
Step 4: Set HTTP to HTTPS redirect
If someone clicks on an old HTTP link, it is important to automatically send it to the HTTPS version.
How to do this:
- Open your site’s .htaccess file from FTP or hosting panel
- Make sure to take a backup of the file
Add this code at the top of the file:
RewriteEngine On RewriteCond %{HTTPS} !=on RewriteRule ^(.*)$ https://%{HTTP_HOST}/$1 [R=301,L] Save and test the site - now every HTTP link will be redirected to HTTPS.Step 5: Test SSL to make sure
- Everything is secure.
- After setting up everything, test whether everything is working properly or not.
Free tests are conducted using tools like SSL Labs:
- Should get a high score (A or A+)
- All files should be loaded via HTTPS
There should not be any old or weak security
Make Your Site Feel Safe for Every Visitor
When your website shows “Secure” in the browser, people trust it more.
They easily share data on your site, fill forms or even make purchases.
What you need to do:
- Get an SSL certificate (free options are also available)
- Update the URLs of the website to HTTPS
- Fix mixed content (HTTP images or files)
- Set HTTP to HTTPS redirect
- Test your SSL to make sure everything is secure
If you have done all these steps, then congratulations! You have not only made your website secure, but also increased the trust of your brand!
If you still need help:
- Contact your hosting provider
- Or take help from a web developer so that everything is set up correctly
Remember : having a secure website is not just a benefit, it is essential for your growth and reputation.
Related Guide:
Install Google Analytics: https://wpguidepro.com/install-google-analytics-wordpress/
Enable Phone OTP: https://wpguidepro.com/enable-phone-otp-login-in-wordpress/
Google Lighthouse: https://wpguidepro.com/google-lighthouse-improves-your-website-ux-fast/
Matomo Analytics: https://wpguidepro.com/matomo-analytics-wordpress-setup/
Collect Stripe Taxes: https://wpguidepro.com/collect-stripe-taxes-easily-in-wordpress/
