

WordPress is the most used platform for creating websites these days. This platform is easy and many things can be changed as per your wish.
Nowadays people want their login to be easy and safe. For this a new method has come up which is called “Enable Phone OTP Login”. In this users can login by just entering their mobile number and OTP code – no password is required.
Today we will tell you how to install this system in WordPress site – step by step. And along with that you will also learn how to login in one click from Google button.
So get ready! Make your website even better, and give users an easy and safe login method!
Want to stay ahead with AI-driven WordPress insights and stay updated with the latest trends? Subscribe for daily search insights at wpguidepro.com to improve your WordPress strategy!
Table of Contents

Why Let WordPress Users Log in With Their Phone OTP Login Numbers?
Easy for users Nobody likes to remember a lot of passwords. When you provide the option of login by phone number, users do not have to worry about forgetting or resetting the password. Just a simple OTP message comes on the mobile, and they login immediately.
More Security Passwords often get hacked, especially when people use the same password everywhere. But in OTP login, every time a new code comes which goes only to the user’s verified number. This increases the security level of the website.
Works everywhere Phone number login is easy for everyone – whether the user is young or old, tech savvy or not. Everyone knows how to use text messages and OTP login codes.
Support Team’s work Users who forget their password send a lot of messages to the support team. But when you use OTP login based, such issues are reduced to a great extent.
From simplifying the user experience to increasing security, you can easily add the Login with Phone Number feature to your WordPress site.

How to Add Login with Phone Number via OTP login in WordPress
OTP Login via may seem difficult, but with the right tools it becomes very easy. Here is a simple step-by-step guide that will help you.
Step 1: Choose the right plugin
First of all, you have to choose a WordPress plugin that provides OTP login feature. Some popular plugins are:
These plugins also have a free version, and if you want more features, then paid versions are also available.
Step 2: Install and activate the plugin
- To install the plugin, follow these steps in the WordPress dashboard:
- Go to Plugins > Add New.
- Search for something like: “OTP Verification by miniOrange”
- Click on Install Now, then Activate.
Step 3: Set the plugin settings
- When the plugin is activated, open its settings and start the setup:
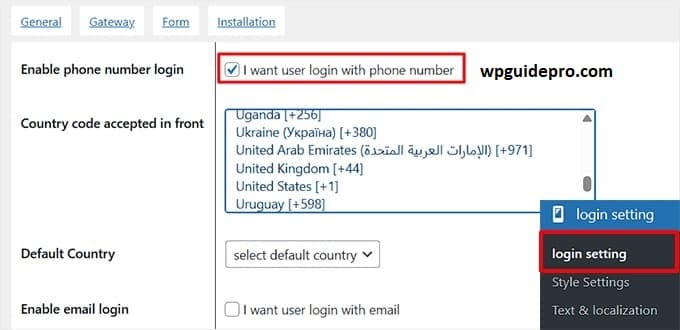
- Verify with OTP by entering your phone number.
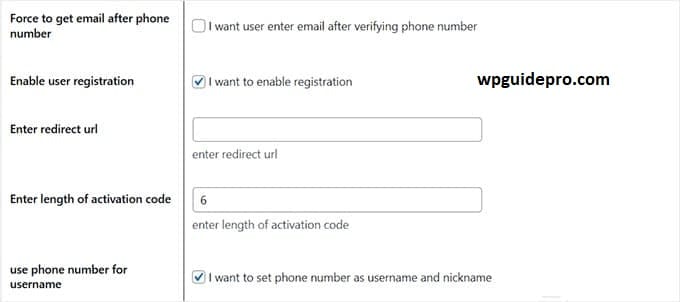
- Decide where to use OTP login: login, registration or both.
- Choose a service to send SMS like: Twilio, Firebase, or Nexmo.
Step 4: Add Phone Number Login Option
- Now you will have to add a phone number option on the login page of your website:
- Some plugins provide a shortcode like: [phone otp login]
- Paste this shortcode where you want the option to login with phone number.
- Or there is a checkbox in the settings which you can turn on.
Step 5: Test the feature
- Now check that everything is working correctly:
- Logout from your admin account.
- Try to login by entering the phone number.
- See if you get an OTP message or not, and if it works correctly or not.
Step 6: Design the Login Page like your brand
Make your login page look like your website’s style:
- Change labels, buttons and messages.
- Improve the design using the plugin’s admin panel or by using custom CSS
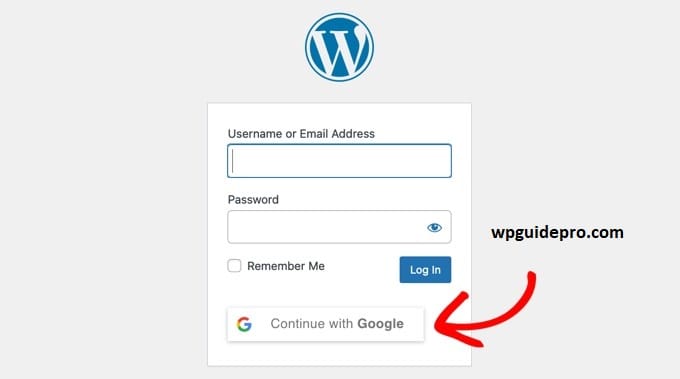
Bonus: Add One-Click Login With Google in WordPress
If you want users to be able to login to Google in just one click, then you need a plugin that provides the option of social login.
Step 1: Choose the right plugin
These are some popular plugins that support Google login:
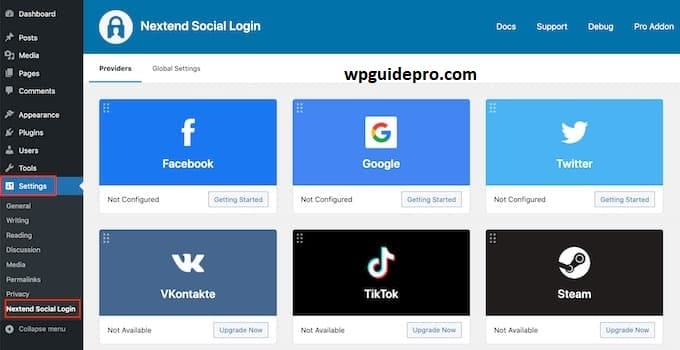
- Nextend Social Login
- Social Login by OneAll
- Super Socializer
These plugins also have the option of Facebook and Twitter login along with Google.
Step 2: Install and activate the plugin
- Go to your WordPress dashboard, and install the plugin exactly as you installed the OTP plugin:
- Go to Plugins > Add New.
- Search the name of the plugin (e.g.: “Nextend Social Login”).
- Click on Install Now, then activate.
Step 3: Setup Google Login
When the plugin is activated, go to its settings and enable Google login:
- Create Google Developer Account:
- Open Google Cloud Console website.
- Create a new project.
- Enable “Google+ API” or “Google People API”.
- Create and copy API Keys:
- From there you will get Client ID and Secret Key.
- Paste both these keys in the settings page of your plugin, where there is a section for Google login.
Step 4: Test and set the design
According to your site Logout from the website and see if the option to login from Google is coming or not.
Change the design, icon and position of the button according to the design of your website so that everything looks smart.
Why Add Google Login?
- Ultimate Convenience: Users linked to Google accounts can access your site with a single click.
- Improved Trust: Users are more likely to use trusted platforms like Google for authentication.
- Less Friction: It eliminates the need for password management, offering a seamless login experience.
Give Users the Login Features They Deserve
Login with Phone Number via OTP or adding Google One-Click Login is a perfect way to balance security and ease for your WordPress website.
This feature makes the login process very simple for users. No need to remember the password, no need to reset it again and again. This saves users’ time and also does not frustrate them.
The best thing is that you do not need any advanced computer or coding knowledge. Just use the right plugin and follow the simple steps given in this guide – your website’s login system will become smart and modern
Related Guide:
Add OAuth Login: https://wpguidepro.com/add-oauth-login-in-wordpress/
Lock WordPress Pages: https://wpguidepro.com/smart-way-lock-wordpress-pages/
Secure Website Tips: https://wpguidepro.com/not-secure-website-5-powerful-reasons-to-fix-it-now/
Social Media Cheat Sheet: https://wpguidepro.com/social-media-cheat-sheet-for-wordpress/
500 Internal Server Error Fix: https://wpguidepro.com/resolve-500-internal-server-error-in-wordpress/
