

Thinking about moving your website from HTML Website to WordPress? You’re in the right place. A few years ago, my website was built with just HTML and CSS. It worked, but updating it was very difficult. For every small change, I had to open the code, make edits, and then upload files. This process was very time-consuming and a bit confusing.
Then I decided to use WordPress. It seemed a little scary at first, but it turned out to be the best decision for my website. WordPress made content management much easier, plugins added new features, and website growth became simpler.
In this guide, I’ll walk you through step-by-step how I migrated my HTML website to WordPress. I’ll show you simple methods that are easy for beginners. Whether you’re moving a single page or an entire site, you’ll have a clear roadmap to the end, making your switch smooth and safe.
Want to stay ahead with AI-driven WordPress insights and stay updated with the latest trends? Subscribe for daily search insights at wpguidepro to improve your WordPress strategy.
Table of Contents
Why Convert Your HTML Website to WordPress?
Imagine your website is currently built with HTML. It’s fast and secure, but as it grows, it becomes difficult to manage. WordPress is better because:

Easy to add content: Creating new pages, writing a blog, or uploading photos is very easy. You don’t need any coding.
Easy to change design and features: WordPress comes with a wide variety of themes and plugins. You can change the look of your website and add new features. Need a contact form, online shop, or photo gallery? There’s a plugin!
Good for Google: WordPress helps your website rank higher on Google.
Building a large website is easy: Whether you have a small blog or a large online store, WordPress will grow with you. It also powers large websites like The New York Times and Sony Music.
How to Convert HTML Website to WordPress
You can move your HTML website to WordPress in two ways, depending on what you want to do.
Scenario 1: Adding a Single HTML Page to WordPress
Sometimes you have a special HTML page like a landing page or a unique design that you want to use in WordPress.
There are two ways:
Method 1: Upload the HTML File
This is the fastest way to get the page live. You’ll need to use an FTP client or your hosting’s file manager.
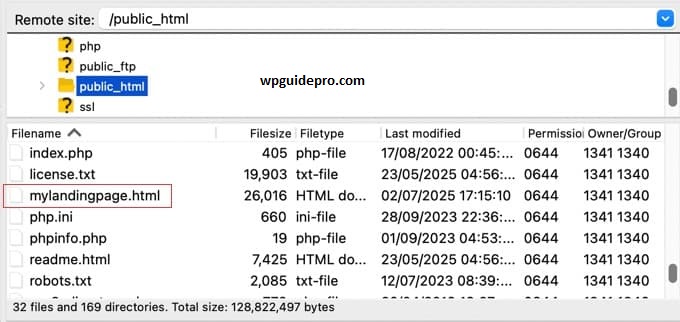
- Connect to your website’s server using FTP.
- Go to the WordPress root folder.
- Create a new folder, give it a simple name, like custom-pages.
- Upload your HTML file and its CSS or images to this folder.
Your page will now open from this link:
yourdomain.com/custom-pages/my-page.htmlNote: This page will not use WordPress’s header or footer and cannot be managed from the dashboard.
Method 2: Create the page in WordPress using the Page Builder
This requires a little effort, but the page will work well with WordPress and will be easy to update in the future.
- Install a page builder plugin, such as Elementor, Beaver Builder, or Spectra.
- Go to Pages > Add New in the WordPress dashboard.
- Open the Page Builder editor.
Design your HTML page just like you would with drag-and-drop add text, images, buttons, and other elements.
This method gives you full control and allows you to update your page in the future without coding.
Use Case 2: When you want to convert an entire
HTML website to WordPress If you want to move your entire HTML site to WordPress, follow these simple steps:
Step 1: Install and set up WordPress
First, you’ll need to install WordPress to create your new website.
Most hosting companies offer one-click install options these days. If you don’t have hosting, options like Bluehost, SiteGround, or WP Engine are best.
After WordPress is installed, log in to your dashboard.
Step 2: Choose a theme similar to your old site
In WordPress, themes control the design of your website.
- Try to choose a theme that resembles your old HTML site.
- Go to Dashboard → Appearance > Themes > Add New. Here you can view free themes.
- Choose the layout, color, and style from the Filter option.
If you want flexible and popular themes, try Astra, Kadence, or Blocksy they’re easy to customize.
Step 3: Set WordPress permalinks
Permalinks are the URLs of your pages and posts. These are important for SEO.
Go to Settings > Permalinks and select the Post name option.
This will create clean and readable URLs, such as: yourdomain.com/about-us
Step 4: Recreate Your Content in WordPress
Now you’ll need to insert your old site’s content into WordPress. This has to be done manually, but it also allows you to refresh your content.
For simple pages: Copy the text from the old HTML file and paste it into the WordPress Block Editor. Add images, headings, and paragraphs there.
For complex layouts: Use a page builder plugin like Elementor. This allows you to design your page with drag-and-drop, just like it was on the old site.
Step 5: Set up redirects to protect SEO
This step is crucial! If your old pages have different URLs, set up 301 redirects. This tells Google that the page has permanently moved to the new URL, preserving SEO value.
You can do this manually in the .htaccess file or easily by using a redirection plugin.
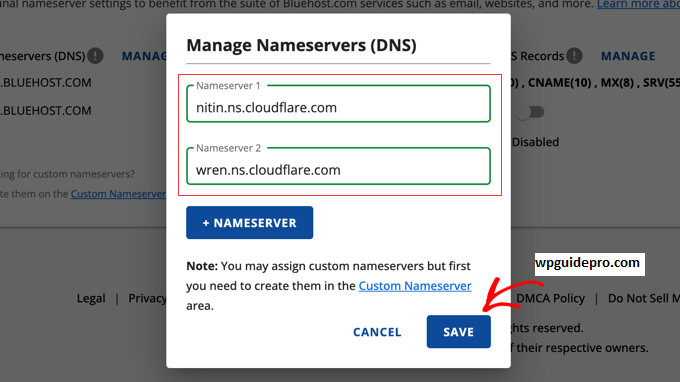
Example: yourdomain.com/about.html → redirect to → yourdomain.com/about/Step 6: Connect your domain to the new WordPress site
When everything is ready, update your domain DNS settings so they point to your new WordPress hosting server.
Nameserver details can be found in your hosting dashboard. DNS updates may take a few hours.
Step 7: Install Important Plugins
Plugins enhance WordPress’ features. Be sure to install these basic plugins:
- Yoast SEO or Rank Math for SEO
- WP Super Cache or W3 Total Cache for making your site faster
- UpdraftPlus for website backup
- Wordfence Security for keeping your site secure
Frequently Asked Questions About Converting HTML to WordPress
Is it free to convert HTML to WordPress?
Yes, it can be. WordPress itself is free, and there are many free themes and plugins available. Your main costs will be web hosting and a domain name.
How long does it take to convert an HTML site to WordPress?
This depends on the size and complexity of your site. A small site with a few pages might take a few hours. A large site with dozens of pages could take a few days of work.
Will I lose my SEO rankings?
Not if you do it correctly. The most important step is to set up 301 redirects from your old URLs to your new ones. This tells Google that your pages have moved, and it will transfer your existing rankings to the new URLs.
