

When I first thought about making a mobile app for turned my WordPress site, I thought it would be very difficult, expensive, and time-consuming. But I was wrong about two things.
The process wasn’t as difficult as I thought it just required a little patience and attention to detail. If your website is a membership site, online group, or content site, creating a mobile app could be even better for your users. They’ll find it easier to use and spend more time.
In this guide, I explain in simple steps how I did it using BuddyBoss, how it’s set up, what mistakes to avoid, and what to understand before you get started.
Want to stay ahead with AI-driven WordPress insights and stay updated with the latest trends? Subscribe for daily search insights at wpguidepro to improve your WordPress strategy.
Table of Contents
Quick Summary: What You Need to Convert Your WordPress Site to an App
If you want to turned my WordPress site into a mobile app, have these things ready in advance:
• WordPress website
• BuddyBoss App plugin and its subscription
• Apple Developer Account
• Google Play Developer Account
• Firebase account
• Basic understanding of WordPress admin settings
If all accounts are ready and you follow the steps carefully, the entire setup can be completed in 4 to 6 hours not difficult, just a little focus. I want it.
Why I Recommend BuddyBoss App – Turned my WordPress site
When I researched different WordPress app development tools, I chose BuddyBoss App and for good reason. This app integrates perfectly with the BuddyBoss Platform and BuddyPress. You get real iOS and Android apps, not just web wrappers. It also offers push notifications, in-app purchases, and offline access.
The best part is that BuddyBoss handles all the technical and complex tasks of app development, yet you have complete control over branding and features. And the best part you don’t even have to write a single line of code.
Before You Begin: Setup Checklist and Cost Estimate
Get these things ready before you begin technical setup:
Required Accounts:
• Apple Developer Account $99 per year
• Google Play Console $25 one-time registration
• Firebase Free
• BuddyBoss App subscription starting at $25 per month
Technical Requirements:
• WordPress version 5.0 or higher
• BuddyBoss Platform or BuddyPress installed
• SSL certificate installed
• Reliable web hosting (preferably a good server)
Time Investment:
• Initial setup 4 to 6 hours
• App store approval from 1 for iOS 2 weeks, 1 to 3 days for Android
• Testing and updates on a regular basis
Budget Tip: Aim for a budget of around $150–$200 for the first month, this will cover both one-time fees and subscriptions
How to Create a Mobile App Using BuddyBoss
Step 1: Install and Connect the BuddyBoss App Plugin
First, purchase the BuddyBoss App plugin from your BuddyBoss account and install it on your turned my WordPress site.

After activating the plugin, go to the dashboard: BuddyBoss > App.
There, you’ll find a setup wizard that will guide you step by step.
Enter your license key and connect your BuddyBoss account, then set up both iOS and Android settings.
The plugin has separate tabs iOS, Android, Firebase, Settings, Branding, Pages, and Build. Everything is clearly organized.
Step 2: Setting up iOS Settings
If you want to create your app for iPhone or iPad, follow these steps:
Create an Apple Developer Account Website: developer.apple.com
Enroll in the Apple Developer Program. Approval usually occurs within 24-48 hours.
Connecting your Apple Account to BuddyBoss Once your Apple Developer account is active, create an API key.
Go to: Users and Access > Keys → Create New Key and access “App Manager.”
Save the file, Key ID, and Issuer ID. These details will be entered in BuddyBoss’s iOS settings.
Bundle ID and Certificates
The Bundle ID is the app’s unique name. BuddyBoss automatically creates certificates and profiles you don’t have to manually do anything.
Creating an App in App Store
Connect Log in to App Store Connect and create a new app. Enter the app name, language, Bundle ID, and SKU (a short unique code). Uploading the app is done later, not right away.
Adding an App ID and Shared Secret
Go to App Store Connect → My Apps > App Information → Create an App-Specific Shared Secret. Paste this key and App ID into BuddyBoss’s iOS settings.
Registering an iPhone for Testing
Connect your iPhone or iPad to your Mac and copy the UDID. Add this UDID to the iOS testing section of the BuddyBoss App plugin.
Step 3: Android Setup (Google Play Console)
Follow these steps to create an Android app:
Create a Google Play Console Account Website: play.google.com/console
Pay $25 once and create a new app. Enter the app name, language, and type.
Create a Service Account in Google Cloud Website: console.cloud.google.com
Create a new project → IAM & Admin > Service Accounts → Create a new service account and grant Editor permission.
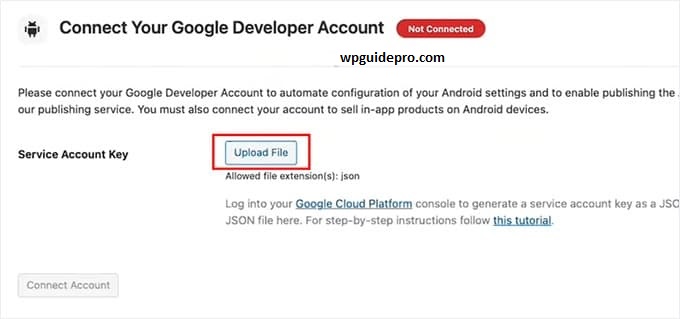
Downloading the JSON API Key Create and download a JSON key file from your service account.
This file is required for connecting BuddyBoss to Google Play.
Uploading the JSON File to BuddyBoss
Go to BuddyBoss’s Android settings and upload the JSON file.
Adding the Application ID
Write down your Android Application ID. Keep the structure the same as the iOS Bundle ID.
Creating the KeyStore File
The KeyStore is for app signing. BuddyBoss can generate it itself. Keep this file and password safe; they are needed for future updates.
Step 4: Firebase Setup for Push Notifications
Firebase handles notifications for both platforms.
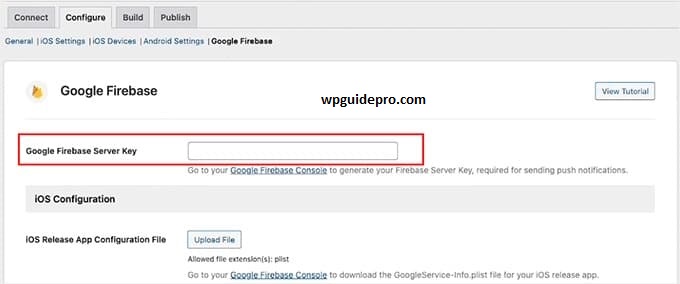
Create a Firebase Project Go to console.firebase.google.com and create a new project.
Open Cloud Messaging Settings Open the Project settings > Cloud Messaging tab.
Add iOS and Android Apps Click Add app and select iOS. Enter your iOS Bundle ID and download the GoogleService-Info.plist file.
Then select Android, enter your Application ID and download the google-services.json file.
Upload the iOS APN Key Go to your Apple Developer account > Certificates, Identifiers & Profiles > Keys → Create a new key and download the .p8 file. Upload this file to Firebase Cloud Messaging.
Upload the Firebase Files to BuddyBoss Upload both files to the Firebase tab of the BuddyBoss plugin: GoogleService-Info.plist and google-services.json.
Step 5: Customizing App Settings and Notifications
The Settings tab in BuddyBoss sets the app’s behavior. From here you can choose:
• Login method
• Deep links
• Push notification settings
• Offline mode
Set notifications carefully too many alerts irritate users.
Step 6: Setting Branding and Design
In the Branding tab, you can change the look of the app:
• Upload an app icon
• Splash screen images
• Color theme
• App store screenshots
Using Canva, you can easily create professional graphics.
Step 7: Creating App Pages
The BuddyBoss App uses a tab-based system. In the Pages section, you can:
• Add or remove tabs
• Link tabs to WordPress pages
• Change the order of tabs
• Choose an icon for each tab
It’s best to have 4-5 main tabs initially, but you can expand based on user feedback.
Step 8: Build and Test the App
Once everything is set up, click the Build button. Building takes 15–30 minutes. The iOS version is tested using TestFlight, the Android version using the APK file or internal testing track.
While testing, check:
• Login and signup are working properly
• Tabs and pages are opening
• Notifications are arriving correctly
• In-app purchases
• Offline mode
• Images and media are loading
• Links are working correctly
Invite some friends to beta test—they’ll point out any minor bugs.
Step 9: Submit to App Stores
For iOS:
• Open App Store Connect and select your app.
• Fill in the description, keywords, and screenshots.
• Upload the app
.• Submit for review.
For Android:
• Open the Google Play Console.
• Complete the store listing .
• Create a new release in the Production section.
• Upload the app bundle.
• Fill in the content rating.
• Submit for review.
Apple reviews take 1–2 weeks; Google reviews usually take 1–3 days. If reviewers request any changes, respond promptly.
Frequently Asked Questions About turned my WordPress site into an App
Q1: What is the total cost of converting Turned a WordPress site into a mobile app?
If you include the first year, the total cost is approximately $500 to $700. This includes:
- Apple Developer Program: $99 per year
- Google Play registration: $25
- BuddyBoss App subscription: $300–$600 per year
- Firebase: Free
Q2: Is coding knowledge necessary to create a WordPress app?
No, no coding is required at all. The BuddyBoss App handles all the technical work on its own.
You just need to know how to use the WordPress dashboard and follow the instructions carefully.
Q3: How long does it take to build and launch an app from a turned my WordPress site?
Initial setup takes approximately 4–6 hours. Testing and build take 1–2 days.
Further:
- Apple review: 1–2 weeks
- Google Play approval: 1–3 days
In total, it takes around 2–4 weeks for the app to be published.
Q4: Can I update the app’s content without uploading it to the App Store again?
Yes, absolutely. When you update the content on the WordPress site, it automatically appears in the app.
Only major design or function changes require a new submission.
Q5: Will my WordPress website still work on mobile browsers?
Yes, 100%. Your website will work normally on all browsers. The app is just an additional option for users, not a replacement for the turned my wordpress site.
Q6: What happens if I cancel my BuddyBoss App subscription?
Your app will continue to work on users’ phones, but you will lose access to updates, notifications, and changes. Updates to new iOS or Android versions may cause app compatibility issues over time.
