

If you’re running a website for a nonprofit, charity, or cause, it means you can reach people around the world with your mission. When people from different countries want to support you, you need a accept international donations donation system that works seamlessly with every country, every currency, and different payment methods.
Setting up international donations in WordPress can seem a little tricky at first. But with the right tools, you can easily create a system where people from anywhere in the world can donate.
In this guide, you’ll find two simple methods for accepting global donations. You’ll also get some easy tips on handling currency, following rules, and providing the best user experience.
Whether you’re starting fundraising for the first time or want to upgrade an old system, this article will walk you through step-by-step how to receive donations from worldwide supporters in WordPress and make your website professional and trustworthy.
Want to stay ahead with AI-driven WordPress insights and stay updated with the latest trends? Subscribe for daily search insights at wpguidepro to improve your WordPress strategy.
Table of Contents
Why Accept International Donations in WordPress?
WordPress powers over 40% of the world’s websites, making it a strong option for organizations that operate globally. When you enable international donations, you reap significant benefits:
Donors multiply: People donate from different countries around the world, and your fundraising can double or triple this way. Many charities receive 20–40% of their donations from international donors.
Full control: With WordPress, you can create custom forms, match them to your website design, and maintain your brand style.
Pocket-friendly: WordPress plugins are generally inexpensive. You don’t have to pay extra monthly fees and get more features.
Data is secure: All donor information remains within your website. This allows you to easily manage them, send updates, and maintain records.
Why You Need to Plan Your International Donations Page
A little planning is essential before starting setup so that your international donation system runs smoothly from day one. Here are some important things to consider:
Choose the Right Payment Gateway
Not every payment processor works everywhere. See what your target donors prefer in each region:
Stripe Supports 135+ currencies and is available in 46+ countries. It is popular in North America, Europe, and many other places.
PayPal: Trusted worldwide and available in 200+ markets. Donors find it safe for online payments.
Local options: Using regional methods like SEPA in Europe, Alipay in China, and UPI in India improves conversion rates.
Keep the currency and language clear
International donors should understand exactly how much they are donating. For this, in the donation form:
- Show the amount in the donor’s local currency.
- If accepting in the base currency, also show the conversion rate.
- Use clear language to indicate where the donation is being processed and whether additional fees may apply.
Understand legal and tax rules
International donations also come with legal and compliance considerations:
- Check the donor’s country’s tax rules and deductibility.
- Understand the reporting requirements for international gifts.
- It’s best to consult a tax expert who understands the rules for international nonprofits.
- Clearly state how you handle international data in your privacy policy.
Method 1: Use Charitable for All-in-One Fundraising Campaigns
Charitable is a WordPress plugin specifically designed for nonprofits and fundraising campaigns. It has multi-currency support and campaign management features, which are very helpful for international donations.
Step 1: Install and activate the plugin.
Go to the WordPress dashboard → Plugins > Add New → search for “Charitable” → install and activate.
Upon activation, a wizard will open that will help you with basic setup (organization information, currency, settings).
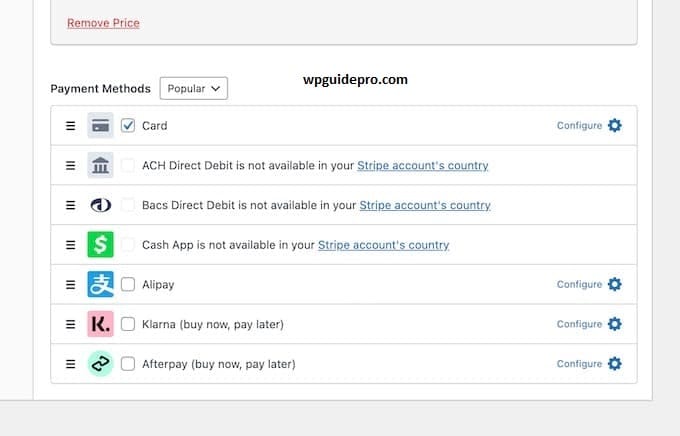
Step 2: Connect a payment gateway.
Go to the dashboard → Charitable > Settings > Payment Gateways.
Stripe: Copy and paste the API keys (publishable and secret) from your Stripe dashboard.
PayPal: Enter your PayPal business account email and save the settings. Enable payment methods and test them to see if everything is working correctly.
Step 3: Create your first campaign
Go to Dashboard → Charitable > Campaigns > Add Campaign. Fill in:
- Campaign title and short description
- Fundraising goal
- Duration
- Images or media
Set the suggested amounts and settings in the donation form as desired.
Step 4: Make it better for international donors
Currency: Set your main currency, but also keep the conversion option on.
Suggested amounts: Donation values vary in each country, so research the amounts before setting them.
Payment options: Enable both Stripe and PayPal so donors can use their preferred option.
Step 5: Customize Donation Receipts
Go to Dashboard → Charitable > Settings > Emails. Ensure receipts contain:
- Organization info and tax ID
- Transaction details with currency
- Donor support contact
- Tax disclaimer
Step 6: Share the Campaign
Once the campaign is live, Charitable provides sharing tools and shortcodes. You can easily add donation forms to posts, pages, or sidebars. Test with a VPN to ensure the donation process runs smoothly in different countries.
Method 2: Use WP Simple Pay for Dedicated Stripe Donation Forms
If you need a simple system with Stripe, WP Simple Pay is the best option. This plugin creates easy donation forms and also offers international support.
Step 1: Install and activate the plugin
- Go to the WordPress dashboard → Plugins > Add New → search for WP Simple Pay.
- Install and activate the Moonstone Media plugin.
- Both a free and premium version are available.
The premium version has additional features like recurring donations and advanced customization.
Step 2: Connect a Stripe account
- Go to the Dashboard → Simple Pay > Settings > Keys.
- Copy and paste the publishable key and secret key from your Stripe dashboard.
- Stripe automatically handles currencies and international payments, making it perfect for global donations.
Step 3: Create a Donation Form
Go to Dashboard → Simple Pay > Payment Forms > Add New. Select Donation under Form Type. Now set the form settings:
- Set the default currency.
- You can choose a fixed amount, a custom amount, or both.
- Add donor info fields.
Step 4: Customize the form and currency
You can customize the design and options in the form builder:
Amount options: Set suggested amounts for international donors. You can also provide currency conversion information.
Form fields: Include only the necessary information to keep the form simple (name, email, country).
Appearance: Use built-in styles or custom CSS to match the website design.
Step 5: Add the form to your website
Each form has a shortcode. Copy and paste this shortcode into a post, page, or widget.
You can also add the form directly from the WordPress block editor.
Step 6: Test the donation form
Test the form thoroughly before launching:
- Test it in different currencies.
- Check if email receipts are arriving correctly.
- Check if the form displays correctly on mobile devices.
- Check if donor information is being saved correctly.
You can use Stripe’s test mode to make fake transactions.
Frequently Asked Questions About Accept International Donations in WordPress
Can I accept International donations in multiple currencies at the same time?
Yes. Charitable and WP Simple Pay both offer this option. Just like Stripe allows donors to donate in their local currency, you can receive in the currency of your choice.
Are there extra fees for accept international donations?
Yes. This depends on the payment processor. Stripe often charges an extra 1% if the card is international or if the currency needs to be converted. PayPal also has similar fees. This must be included in your fundraising plan.
How should tax receipts be given to accept international donation?
Each country has its own rules. If your organization is registered as a 501(c)(3) in the US, most likely only US taxpayers will receive tax-deductible receipts. Consulting a tax expert is the best option.
What information should you collect from accept international donations?
At a minimum, it’s important to collect their name, email address, and country. If necessary, you can also collect their address for a tax receipt or recognition.
Do international donations require special compliance?
Yes, this depends on the country and type of organization. For example: GDPR (privacy laws), anti-money laundering rules, or reporting requirements for large donations. So, be sure to check the regulations in your country and the donor’s country.
Can I set different suggested donation amounts for different countries?
Most plugins don’t do this automatically. But you can create separate forms, set appropriate amounts for each region, and promote them.
