

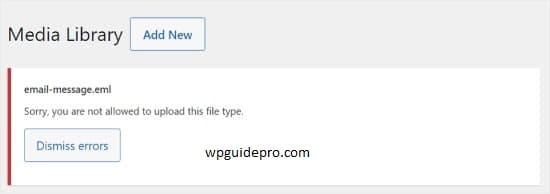
If you are trying to upload a file to your WordPress website and you are getting this error “Sorry, This File Type Not Permitted error for Security Reasons“, then there is no need to worry. This issue happens to many people.
WordPress blocks some file types by default so that the website remains secure. But sometimes you have to upload important files like SVG, PDF or other media files, which cannot be done due to this reason.
The good thing is that there is a solution to this problem, and you do not need to be a coding expert. In this guide, we will tell you 4 easy ways to fix this error.
Whether you are a complete beginner or have some technical experience, you can find the solution to your problem here and the issue of uploading files will be solved.
Want to stay ahead with AI-driven WordPress insights and stay updated with the latest trends? Subscribe for daily search insights at wpguidepro to improve your WordPress strategy!
Table of Contents
What Causes the “Sorry File Type Not Permitted Error for Security Reasons”?
There is a security system inside WordPress that decides which files you can upload to the media library. This restriction is done so that no dangerous file can harm your website.
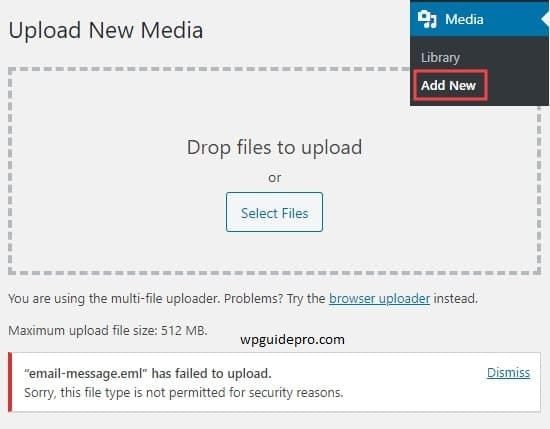
This error often comes when you upload a file whose type WordPress does not consider safe. Some common file types due to which this error comes:
• SVG files
• WEBP images
• AI files
• EPS files
• JSON files
• Custom font files
Sometimes this error can come due to simple spelling mistake or even due to corrupt file. Therefore, you should first check these basic things.
WordPress keeps a list in which only those file types are included which are allowed. If your file is not in that list, then an error will definitely come. The problem is that WordPress does not have many modern file types in its default list, whereas they are safe and people use them on their websites.
Option 1: Check and Fix the File Type Extension Spelling
Before doing any difficult work, check a small thing. This small check often fixes the problem immediately.
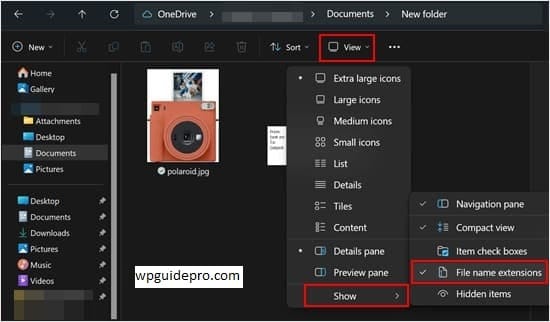
First look carefully at the name of your file. Check if the end of the file is written correctly or not. For example, if you are uploading a photo which is of jpeg type, then its end should be .jpg or .jpeg. If by mistake .jpeg or .jpge is written then an error may occur. Such small spelling mistakes often happen when the name of the file is changed repeatedly.
Then see if the file got broken while downloading or sending it. Open the file in the app where it works normally. If the file does not open or shows some error, then the issue could be in the file, not WordPress.
Check one more thing. See if the end of the file matches with the type of that file or not. Sometimes the file is fine but its end is written wrongly, that is why it does not get uploaded.
If there is any mistake in the name of the file or its end, then correct it and try uploading it again. This small thing often solves the problem without any difficult way.
Option 2: Allow New File Types in WordPress With the File Upload Types Plugin
If you want a solution that does not require coding, the easiest way is to use the File Upload Types plugin. This plugin allows uploading new file types in WordPress.
First of all go to the dashboard of your WordPress website. Then click on Plugins > Add New. There search “File Upload Types by WPForms”. When you find the plugin, click on Install Now. Activate it after installation.
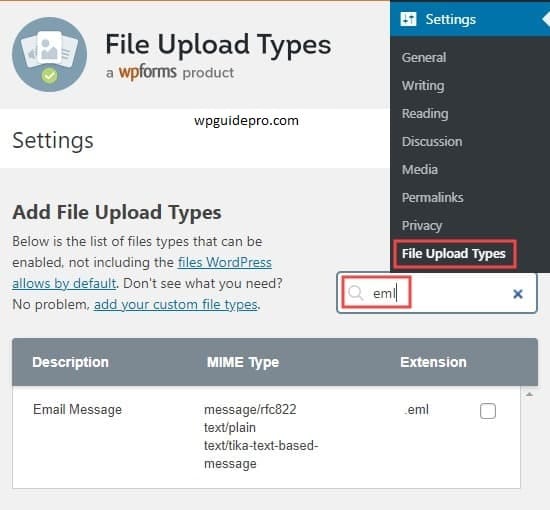
When the plugin is activated, you will see a new option of File Upload Types in the sidebar. Click on it.
Now you will get a page where you will see the allowed file types of WordPress. This list is easy and simple. You can see categories of images, documents, audio, video and other file types there.
If you want to add a new file type, go to the bottom of the page where Add New File Type is written.
There you have to fill three things:
- File extension, such as: svg
- MIME type, such as: image/svg+xml
- Write a short description, such as: SVG image file
Some file types are already given in the plugin which are not allowed by default. You can allow them by ticking the boxes in front of them. This work is very easy.
After setting everything, click on Save Changes. Then try uploading your file again. If everything is fine then the file will be uploaded and there will be no error.
Option 3: Allow New SVG File Types Using WPCode
If you want to upload some special file types like SVG and you like using code, then you can use WPCode plugin. This plugin provides a safe way to add code in WordPress.
First of all go to WordPress dashboard and install WPCode plugin. This plugin lets you add custom code without opening theme files. It is very safe for beginners.
When the plugin is activated, go to Code Snippets > Add Snippet. There you will get ready-made code. If you want to allow SVG upload, then select the code of that name.
If you want to allow any other file type, then click on “Add Your Custom Code”. There you will have to write your code which tells WordPress that this file type should also be uploaded.
There are 2 things in this code:
- A part which allows new file types
- A part which checks the file while uploading
If you are writing custom code, then first try it on a test site if possible. Because if there is a mistake in the code then the website may get damaged.
The advantage of WPCode is that even if you update the theme or WordPress, the code does not get deleted. And if ever the code needs to be turned off or changed, it can be done easily with the plugin.
Option 4: Edit Your wp-config.php File (Advanced)
If you have a little idea of file editing or FTP, then you can fix the WordPress file upload issue by editing the wp config file.
But before making any changes, make sure to make a complete backup of your website. If there is a mistake in editing, the website can shut down. With the backup, you can make the site normal again.
Now use FTP, cpanel file manager or hosting file manager to access your website files. Go to the main folder of WordPress and find the wp config file.
Download this file first so that an extra backup is made. Then open the file in any text editor like notepad.
Find a line in the file where it is written:
- You have to write your code a little above this line.
Write this line there:
define ALLOW UNFILTERED UPLOADS trueThis means that now admin users can upload any file type without WordPress stopping them.
- Save the file and upload it back to the server.
Then upload the file again and check whether the issue is resolved or not.
But remember one thing: this way the safety of WordPress is compromised. So use it only when you have full trust in your users and you have also installed a security plugin.
When the file is uploaded, it would be better to remove this line or use a security plugin so that the site remains safe and the work is also done
