

The privacy law, known as CCPA, says that some websites must tell users that their data can be prevented from being sold.
If your website collects personal data from people in California, you need to create a page called Do Not Sell My Info.
Creating this page is not difficult. It is very easy to do this on WordPress. In this guide, we will show you how to create this page in simple steps.
If you run an online store, write a blog, or run a business website, this page is helpful for you and your users.
Now let us learn how this page is created on a WordPress website.
Want to stay ahead with AI-driven WordPress insights and stay updated with the latest trends? Subscribe for daily search insights at wpguidepro to improve your WordPress strategy!
Table of Contents
Why Do You Need a ‘Do Not Sell My Info’ Page?
A law called the CCPA gives Californians certain rights over their personal data. One of these rights is that they can stop their data from being sold.
If your business is subject to the CCPA rules, you need to give users a simple way to exercise these rights.
You should create a Do Not Sell My Info page if your website:
- Collects personal information of people in California
- Earns more than $25 million annually
- Sells personal information of 50,000 or more people each year
- Earns most or all of its income by selling personal information
Even if this law does not apply to you, it is still good to provide this option. This increases the trust of users. When people see that you are honest with their data, they trust your site more.
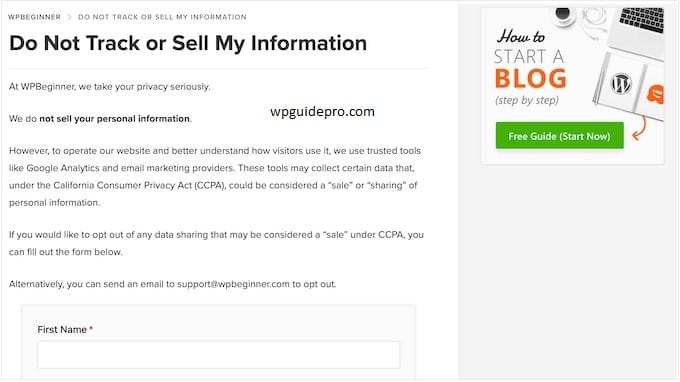
The Do Not Sell My Info page is a central place where users can send requests not to sell their data. If you do not create this page, you could break the law and lose people’s trust.
How to Create a Do Not Sell My Info Page in WordPress
A few things work together to create this page:
Consent system, a separate WordPress page, a form where people can submit their requests, and a system that handles those requests.
For this process, you will need to install a few plugins and set them up correctly.
We will use the WPConsent plugin as our base, and some special addons that handle opt-out forms and requests.
Before you start, check these things:
- Your WordPress site is up to date
- You have admin access
- You should read your privacy policy carefully, so you know what data you collect and how you use it
Step 1: Set Up WPConsent
WPConsent is a plugin used to manage user consent and privacy settings on a WordPress site.
This plugin helps track user choices to collect and sell data.
First, install WPConsent:
- Go to the WordPress dashboard
- Click on Plugins > Add New
- Type WPConsent in the search box
When you find the plugin, install it and then click the Activate button
When the plugin is activated, it works in conjunction with your website’s privacy tools. This plugin works in the background where it tracks user consent and shares information with other privacy plugins.
To adjust settings:
- Go to Settings > WPConsent in the dashboard
- Check the default options there
Change the options that are necessary for your website so that your site complies with the law
Step 2: Create a WordPress Page
Now create a new WordPress page that will just do the work of Do Not Sell My Info.
On this page you will put the opt-out form and tell how you handle users data.
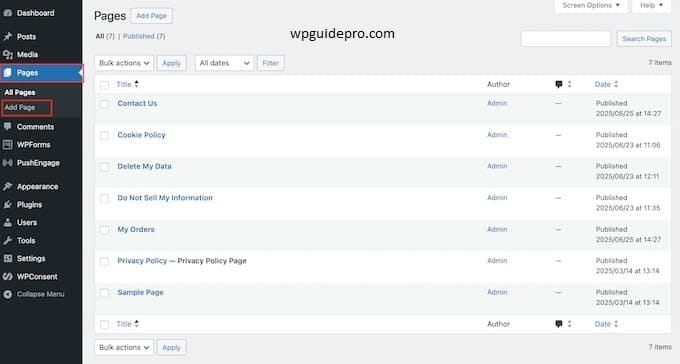
How to create a page:
- Go to WordPress dashboard
- Click on Pages > Add New
Name the page: Do Not Sell My Personal Information or any such name which is easily understood by everyone
Write all these things inside the page:
- What personal data do you collect
- How can that data be sold or shared
- If a user opts out, what does it mean
- Tell step by step what the user should do if he does not want to sell his data
Make sure to add these things too:
- What does sell data mean under CCPA
- What do you do What type of data do we collect and where do we share it
- How long does the opt-out request remain active
- If someone has a privacy question, how to contact
For now, Save as Draft the page.
In the next steps, you will place the opt-out form on this page
Step 3: Install the Do Not Track Addon
The Do Not Track addon is an extra part of the WPConsent plugin that specifically handles “Do Not Sell” requests. This addon creates forms and sets up a tracking system so that your site complies with CCPA law.
How to install the addon:
- Go to the WordPress dashboard
- Search for Plugins > Add New
- If you have downloaded the addon before, you can manually upload it
Make sure the addon is compatible with your WPConsent and WordPress version
When the addon is activated:
- New options are added to WPConsent settings
- These options control how opt-out requests are stored and handled
Set the addon settings according to your website:
- See how long data will be stored
- How to get notifications when someone requests it
With your privacy tools How will these add-ons work together.
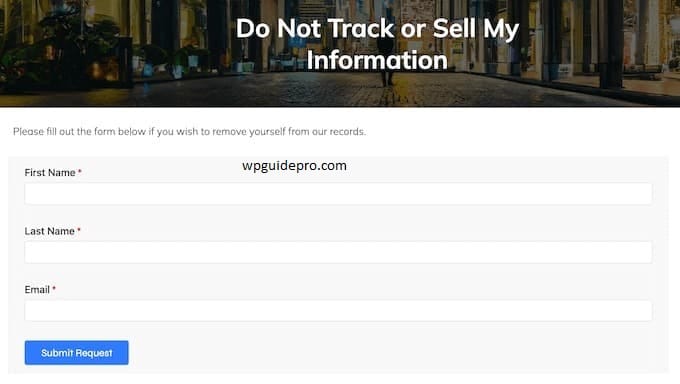
Step 4: Create the ‘Do Not Sell My Info’ Form
Opt-out forms collect data from users who do not want their personal data to be sold.
The form should be simple, but complete enough to process the request correctly.
To create a form:
- Go to the Do Not Track addon settings and open the form builder
Add these fields:
• Full name
• Email address
• If needed, extra info for verification
• Opt-out reason
- Keep the form short, but take the necessary information. People do not complete a long form and compliance can be a problem.
Set up form validation so that:
- User should provide correct and complete information
- Format should also be correct
Set confirmation message as well:
- In which user should be told what will happen after sending the form
Before making the form live, make sure to test it:
- Send test request yourself
- Check whether data is being captured correctly and whether notification is being received or not
Step 5: Adding the Form to Your Page
Now go back to the WordPress page you created earlier and add the opt-out form to it.
More privacy plugins provide a shortcode or block that lets you insert the form directly into the page content.
Place the form at the top of the page, after the explanation text, so that users can easily see and fill the form – without scrolling too much.
Write a short introduction before the form, explaining what information is needed in the form and how the request will be processed. This does not confuse users and they can easily complete the form.
Preview the page to make sure the form looks correct and matches the design of your site. The form should be easy to read and use on both desktop and mobile.
Step 6: Add Links to Key Areas
Place the link to your Do Not Sell My Info page in a place where people can easily see it. Add this link in important areas of the website.
Make sure to place this link in the Privacy Policy page. Most people see the opt-out option there, so direct access should be from there.
Add the link in the footer of the website as well. Footer is the place where privacy and legal pages are, and people expect this information there.
If your site has a login or account page, it would be good to provide this link there as well. Users often see their privacy settings there.
If you are using a cookie banner or consent notice, then add this link to it as well. When people are already thinking about privacy, it is easy for them if they get this option at that time.
Step 7: Manage Incoming Requests
Build a system that can quickly view opt-out requests and process them on time.
According to CCPA rules, you have to respond to requests within 45 days.
Turn on email alert so that whenever a new request comes in, you know about it immediately. This allows you to take action quickly and shows that you care about user privacy.
Build a simple plan where you first check whether the request is genuine or not.
Then if everything is correct, complete the process of that request. Keep this plan written down, so that if other people work in the team, everyone works in the same way.
Set an auto message that informs the user immediately that their request has been met, and when they will get a response.
People love it when they get a timely response.
It is also important to keep a record of all requests and steps taken. This record comes in handy during audit and shows that you care about user rights
Do Not Sell My Info Pages: FAQs
How long is an opt-out request valid for?
Under CCPA, once a user opts out, their request is valid for at least 12 months.
You can’t ask them for permission to sell their data again during that time but if the user allows it again, that’s a different matter.
Do I have to verify every opt-out request?
Yes, it’s important to verify requests to ensure that there are no fraudulent or incorrect requests.
But verification should not be so difficult that genuine users can’t make the request.
Can I charge for processing the opt-out request?
Absolutely not. You cannot charge any fee or fee to any user. The opt-out process should be free and easy.
If I don’t sell anyone’s data, will I have to provide an opt-out option?
Yes, I should. Even if you are not selling data right now, having an opt-out option is a good privacy practice. If your business model changes tomorrow, you will already be ready.
How to handle opt-out requests from children?
CCPA says that before selling data of children under 16 years of age, their explicit opt-in consent has to be taken.
