

It is very beneficial to add Facebook Open Graph metadata to WordPress theme. When your website link is shared on Facebook, you can decide how the image, text and title should appear.
If these things are good, people will click more. This increases traffic to your website.
This step by step guide will tell you 3 ways through which you can add Facebook Open Graph metadata to your WordPress site. This guide is for both beginners and advanced users.
By the end of this article, you will learn how to improve your social media preview and how to increase traffic.
Want to stay ahead with AI-driven in WordPress insights and stay updated with the latest trends? Subscribe for daily search insights at wpguidepro.com to improve your WordPress strategy.
Table of Contents
Method 1: Adding Facebook Open Graph Metadata With AIOSEO
AIOSEO (All-in-One SEO) is a very easy and user-friendly plugin for WordPress. With this you can add Open Graph metadata without coding.
Step 1: Install and activate AIOSEO
First of all go to the WordPress dashboard.
There click on Plugins > Add New. Search for All in One SEO and install and activate it.
Step 2: Turn on Social Metadata settings
Go to All in One SEO > Social Networks in the WordPress sidebar.
Open the Facebook tab and turn on Add Open Graph Metadata.
Click on Save changes.
Step 3: Set Open Graph Metadata
Set Home Page Image. This will be the image that will be shown as the default thumbnail on Facebook.
Write Home Title and Home Description. These will show the title and text of your website on Facebook.
If you need different settings for any page or post, then go to AIOSEO Settings below the editor of that page. From there you can set the title, description, and image of the Open Graph separately.
AIOSEO does a lot of work on its own, so it is best for those people who are beginners and want to do SEO easily
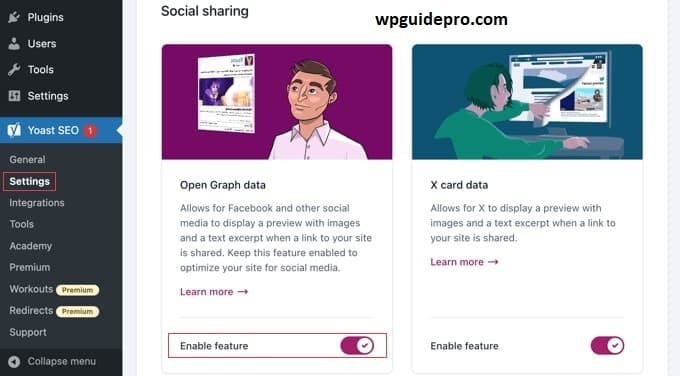
Method 2: Set Facebook Open Graph Metadata Using Yoast SEO
If you are already using Yoast SEO plugin then there is good news – this plugin already has the option of Open Graph metadata.
Step 1: Install and activate Yoast SEO
If Yoast SEO is not already installed then go to Plugins > Add New in WordPress dashboard. Search Yoast SEO, install and activate it.
Step 2: Turn on Open Graph metadata
Go to Yoast SEO > Social in WordPress sidebar.
Click on Facebook tab.
Turn on Add Open Graph metadata and save the settings.
Step 3: Set Social metadata
If you want to set the title, description or image of any post or page separately then:
Open that post or page.
Scroll down until you see the Yoast SEO box.
Open the Social tab and upload Facebook Title, Description and image there.
Yoast SEO is best for people who are already using this plugin for SEO and want to improve Facebook sharing as well.
Method 3: Adding Facebook Open Graph Metadata Using Code
If you know a little coding and want more control over things, then manually adding Open Graph metadata is a good way. This requires some PHP knowledge but with this you can create the preview you want.
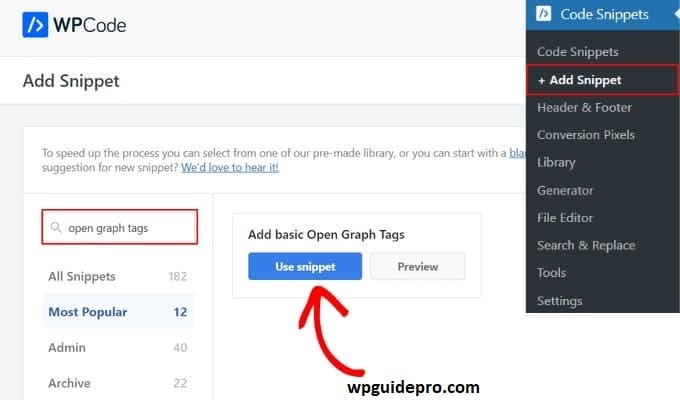
Step 1: Open the theme’s functions file
Go to Appearance in the WordPress dashboard, then click on Theme Editor. There find the functions.php file. Make sure to take a backup of the theme before making any changes.
Step 2: Install the code
Paste the code given below in the functions.php file:
function add_open_graph_meta_tags() {
    if(is_single()) {
        global $post;
        echo '<meta property="og:title" content="' . get_the_title($post->ID) . '"/>';
        echo '<meta property="og:description" content="' . get_the_excerpt($post->ID) . '"/>';
        echo '<meta property="og:url" content="' . get_permalink($post->ID) . '"/>';
        echo '<meta property="og:image" content="' . get_the_post_thumbnail_url($post->ID) . '"/>';
    }
}
add_action('wp_head', 'add_open_graph_meta_tags');
Step 3: Testing the Code
Save the file and open any blog post of your site. Right click and go to View Page Source. Check whether the meta tags are visible or not.
Step 4: Checking with Facebook debugger
Paste the link of your post in the Facebook Sharing Debugger tool. Click on debug and check whether everything is working properly or not.
This method is for those people who have some understanding of coding and want to customize their WordPress theme according to their needs.
Expert Guides on Facebook and WordPress
When you want Facebook and your WordPress website to work well together, just using Open Graph metadata is not enough. There are some other things too which help you in improving the performance of your site:
Improve the speed of the website
If your website loads quickly then people stay on it for a longer time. For this you can use tools like WP Rocket.
Keep the style of images like the brand Whatever images you are using should be of high quality and should be in accordance with the look of your brand.
Keep checking the data of the website With tools like Facebook Pixel and Google Analytics, you can know whether people are liking your content or not.
Use Schema markup Apart from Open Graph, you can also use Schema Markup. This makes your site more visible on Google and social media
